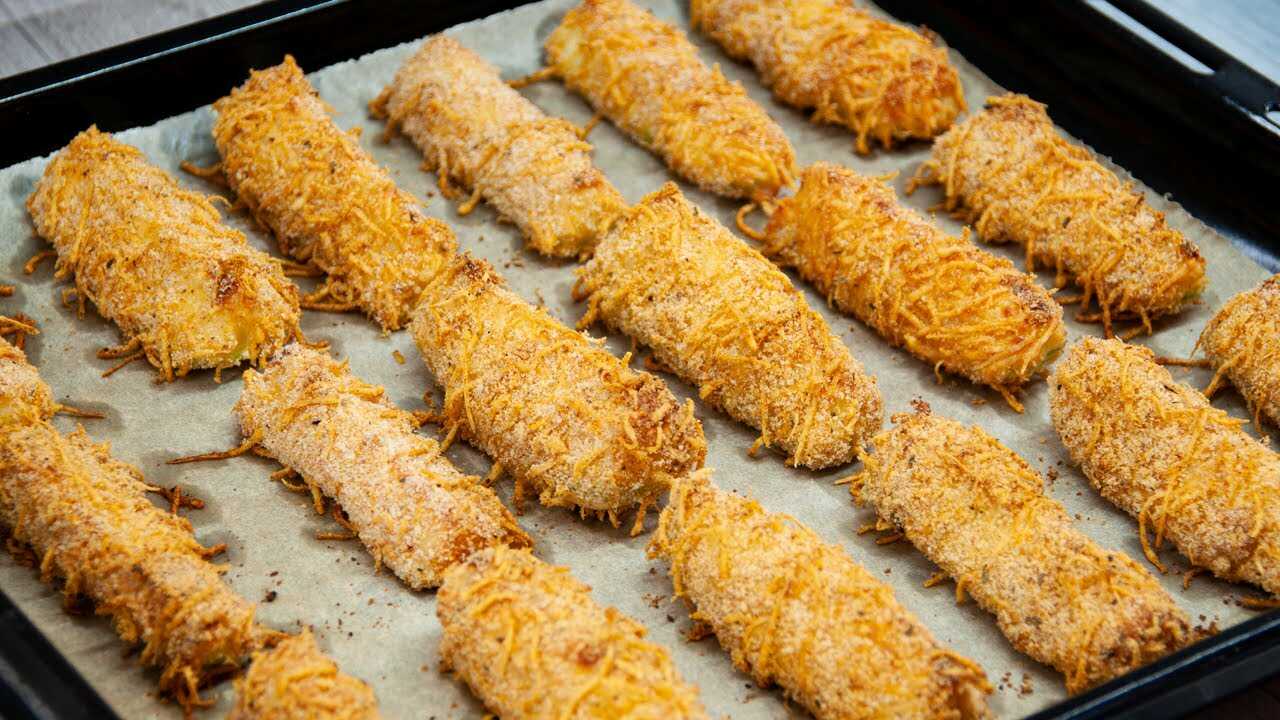
🥒 Crispy Baked Zucchini Sticks — No Deep Frying, No Greasy Coating
# 🥒 Crispy Baked Zucchini Sticks — No Deep Frying, No Greasy Coating
These zucchini sticks are breaded and baked rather than deep-fried. The source gives clear quantities, a 10-minute salting step and a 25-minute bake at 200°C, so the method can be reproduced closely.
## Table of Contents
– Ingredients and source details
– Step-by-step preparation
– Texture and technique
– Variations
– Serving and storage
– Common mistakes
– FAQ
– Conclusion
## Ingredients
– 2 sliced zucchini
– salt
– 100 g breadcrumbs
– dried garlic
– black pepper
– paprika
– basil
– 100 g grated cheese
– 2 eggs
– 2 tablespoons flour
### Dip
– 4 tablespoons sour cream
– dill
– 1 garlic clove
## Prepare the Zucchini
Slice the 2 zucchini into sticks or similarly sized pieces. Salt them and leave them for 10 minutes. This is not just for seasoning: salt draws moisture to the surface.
After 10 minutes, pat the zucchini very dry. If the surface remains wet, the flour turns pasty and the coating slides off.
## Build the Breading Station
Mix 100 g breadcrumbs with dried garlic, pepper, paprika and basil. Grate 100 g cheese and combine it with the seasoned breadcrumbs.
Beat the 2 eggs separately.
Place the dried zucchini into a bag, add 2 tablespoons flour and shake until every piece has a thin coating. The flour layer should be light rather than thick.
## Bread and Bake
Dip each floured zucchini piece into beaten egg, then roll it in the breadcrumb-and-cheese mixture. Arrange the pieces on parchment with space between them.
Bake at 200°C for 25 minutes.
Do not crowd the tray. If pieces touch each other, steam gets trapped and the coating softens.
## Make the Dip
Mix 4 tablespoons sour cream with chopped dill and 1 minced garlic clove. Keep the dip refrigerated until serving.
Do not pour the sauce over the zucchini in advance. Serve it on the side so the crust stays crisp.
## Why the Coating Turns Crisp
Crispness depends on three things: a dry zucchini surface, a thin flour layer and free circulation of hot air. The cheese also contributes browning and flavor.
If your oven heats unevenly, rotate the tray near the end. If the cheese browns very quickly, start checking a few minutes early rather than extending the bake blindly.
## Can You Use Panko?
Yes. Panko generally gives a lighter, rougher crust. If you substitute it for the 100 g breadcrumbs, watch the color because a coarse coating may brown differently.
## Batch Cooking
For a larger amount, use two trays rather than packing everything onto one. If both trays bake at once, switch their positions partway through if your oven has hot spots.
## Storage and Reheating
These sticks are best fresh. Refrigerate leftovers without sauce. Reheat in an oven or air fryer; microwaving warms them but softens the crust.
## Common Mistakes
Do not skip the 10-minute salting step, do not leave visible water on the zucchini, do not make a thick flour coat and do not pile pieces on the tray.
## FAQ
### Should zucchini be peeled?
No, not usually.
### Can I use frozen zucchini?
Not for this texture. Frozen zucchini releases too much water after thawing.
### Is oil necessary?
The source specifically aims for a no-frying method. The cheese and dry heat provide browning.
### How do I know the center is done?
The crust should be golden and the zucchini tender but still able to hold its shape.
## Conclusion
This method proves that crisp zucchini does not require deep frying. Careful drying and a well-spaced tray matter more than extra fat.
## How to Get a Truly Crisp Oven Coating
The 10-minute salting period is one of the most important steps in the source. Salt draws moisture to the surface of the zucchini. That moisture then has to be removed. If you salt and immediately bread without drying, the flour absorbs the surface water and becomes sticky.
The bag method with 2 tablespoons flour is efficient because it distributes a thin coat. Shake off excess flour. A heavy white layer creates a floury taste and can separate from the egg.
The egg should coat the flour but not drip heavily. Let excess egg fall back into the bowl before pressing the piece into the 100 g breadcrumb and 100 g cheese mixture.
### Tray Arrangement
Place every piece in a single layer. Leave visible space. Hot air needs to reach the sides so steam escapes.
If you bake two trays at once, switch their positions partway through if your oven browns unevenly. Fan-assisted ovens may brown faster, especially because the coating contains cheese.
### Spice Balance
Dried garlic, paprika and basil are all included in the source. Black pepper adds heat without moisture. If you use smoked paprika instead of regular paprika, the flavor becomes stronger and more barbecue-like.
Because the 100 g grated cheese is already salty, use salt carefully after the initial zucchini salting step.
### The 200°C / 25-Minute Bake
The source gives a clear endpoint: 25 minutes at 200°C. Start checking near the end. If your sticks are much thinner than those in the source, they may be ready a little sooner. If they are much thicker, the center may need more time.
The coating should feel dry and look golden. The zucchini should be tender enough to bite but not mushy.
### Sour-Cream Dip
The dip is deliberately simple: 4 tablespoons sour cream, dill and 1 garlic clove. It needs no complicated seasoning to complement the crust.
Make it while the zucchini is in the oven. Keep it cold until serving. The temperature contrast between hot crisp sticks and cold dip is part of what makes the recipe appealing.
### Variations
Panko can replace fine breadcrumbs for a rougher crust. Parmesan or another hard dry cheese works better than very wet mozzarella in the coating.
The same method can be used for eggplant or firm summer squash, but moisture and baking time will differ.
### Make-Ahead Strategy
Do not bread the zucchini hours in advance. The salt and vegetables will continue releasing water, which slowly softens the coating.
You can, however, prepare the seasoned breadcrumb mixture and dip earlier. Keep the dry mixture covered at room temperature and the dip refrigerated.
### Reheating
Use an oven or air fryer. Spread leftovers in one layer and heat until the coating is dry again. A microwave warms the center but traps steam.
### Final Check
This recipe does not need frying oil because the oven, dry coating and cheese provide the surface texture. The key is not simply “no oil”; it is careful drying before breading and enough space on the tray.
## Extra Tips for Better Results
If you are serving these sticks to several people, prepare the dip before breading the zucchini. Once the zucchini is coated, it should go into the oven fairly quickly so the coating does not absorb moisture while waiting.
A perforated baking tray or rack can improve airflow, but parchment on a normal tray works well if the pieces are spaced. If you use fan-assisted heat, begin checking the color a few minutes before the 25-minute mark because the cheese may brown faster.
For a stronger garlic flavor, keep the dried garlic in the breadcrumb mix and reserve fresh garlic for the sour-cream dip. Fresh garlic on the exposed crumb can darken at 200°C.
You can also make the flavor milder for children by reducing paprika and garlic while keeping the cheese and basil.
When leftovers cool, do not seal them while still warm. Trapped steam softens the coating. Let them cool on a rack first, then refrigerate.
A good baked zucchini stick should bend slightly when bitten but not collapse. If the center is very soft and watery, cut the pieces a little thicker next time or shorten the bake slightly. If the center is still firm, use more uniform pieces rather than simply adding extra time for the entire tray.
The recipe works because each layer has a purpose: flour dries and grips, egg glues, crumbs create texture, cheese browns, and dry oven heat sets the crust.