Creative way to Upcycle Pallets into flower planter box | DIY Garden ideas
Creative way to Upcycle Pallets into flower planter box | DIY Garden ideas
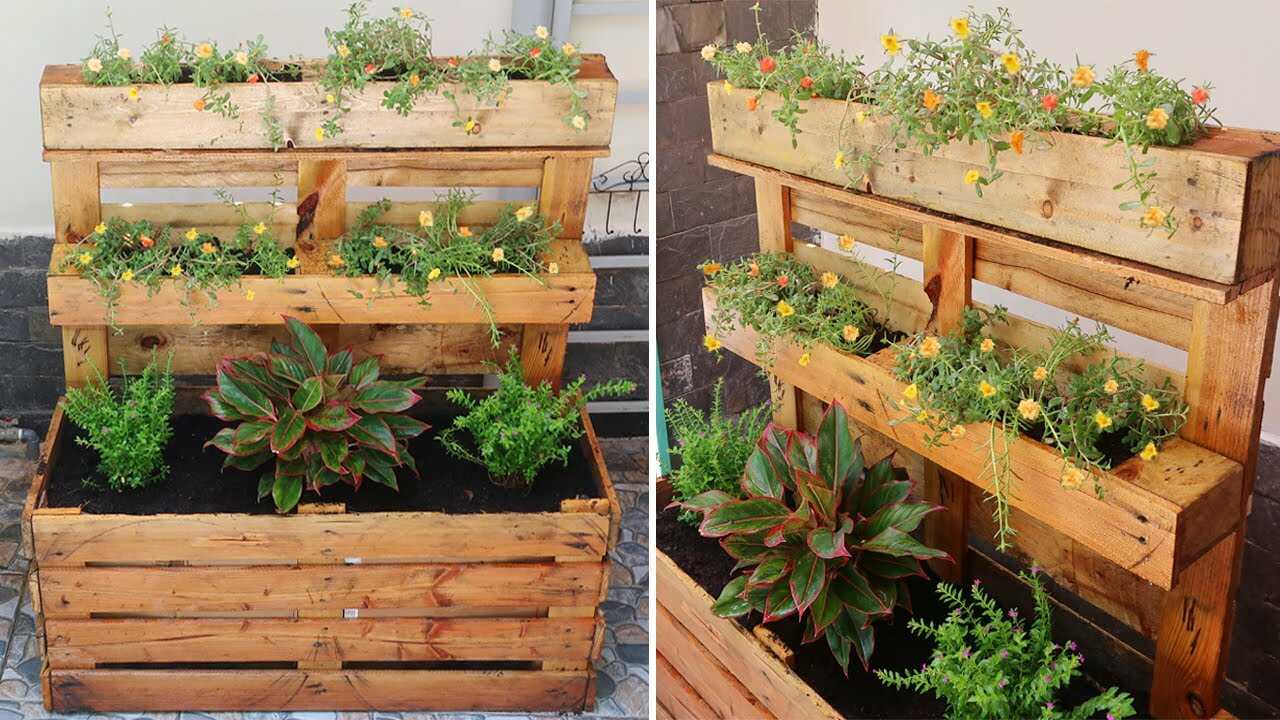
That photo shows a charming three-tier pallet planter made from natural, slatted pallet wood: warm, rough-grain boards formed into a deep lower box and two shallow troughs fixed to the pallet face. This project uses the wood’s natural porosity and insulating properties to create micro-environments for both shallow annuals and deeper root plants. Below is a practical, step-by-step guide to recreate it safely and reliably, plus horticultural reasons for each choice.
Why use pallet wood (and what to watch for)
Pallet wood is porous, breathable and provides insulation for roots—helpful for moderating soil temperature in small planter pockets. Over time, wood in contact with soil will slowly break down and add organic matter, encouraging beneficial microbes. However, not all pallets are safe:
- Choose pallets stamped “HT” (heat-treated). These are kiln-dried and do not contain fumigants. Avoid pallets stamped “MB” (methyl bromide) or any with unusual chemical smells, heavy paint, or oily residues.
- Inspect boards for rot, heavy staining or nails that cannot be removed safely. Use boards in sound condition.
- Protect wood–soil contact by lining troughs so chemicals (if any) and tannins won’t leach into the soil and so the wood lasts longer.
Materials and exact measures
- One standard pallet (typical 48″ x 40″)—select HT-stamped.
- Additional 2×4 supports if needed (cut to pallet height) for reinforcement.
- Heavy-duty landscape fabric (6 oz/yd²) or pond liner rated for planting—cut to fit each trough and the lower box.
- Exterior-grade stainless or hot-dipped galvanized screws (1¼” to 2½” depending on join).
- Staples or upholstery tacks to secure fabric; drill/driver; jigsaw or circular saw if resizing boards.
- Soil mix: 60% premium potting mix, 30% well-rotted compost, 10% coarse perlite or horticultural grit (by volume).
- Optional: raw linseed oil (food-safe grade) or exterior water-based sealer—one coat before planting.
Step-by-step build and planting (detailed)
Follow these steps exactly to build a durable, plant-safe pallet planter that performs well over several seasons.
- Select & prepare the pallet: Confirm the HT stamp. Remove cracked or heavily stained boards. Sand any sharp splinters where you or plants will touch. If you need a deeper lower box, attach extra pallet boards vertically with 2½” galvanized screws to raise the front lip.
- Create troughs: Use two boards per trough (or a long board cut to form a rectangular trough). Line the interior with landscape fabric, stapling along the top edge and trimming excess. Leave the bottom fabric with ½–1″ clearance at drain points so water can exit. For each trough, drill 6–10 drainage holes of 6–8 mm (about ¼–⅜”) spaced every 10–15 cm along the bottom.
- Apply a protective coat: If you choose to seal the inside, brush one thin coat of raw linseed oil or a cured, water-based exterior sealer inside the lined areas only. Allow 48 hours dry time before adding soil. Reapply protective coating once a year in spring.
- Mix and fill soil: Combine potting mix (60%), compost (30%) and perlite (10%). For the lower box aim for a depth of 25–30 cm (10–12″) to accommodate small shrubs and larger annuals; shallow troughs should be 10–12 cm (4–5″) deep for trailing annuals and herbs. Fill and firm slightly—do not compact.
- Planting plan: Use deeper-rooted or specimen plants (small shrubs, layered foliage) in the bottom box and shallow, trailing bloomers in the upper troughs. Space plants according to mature width—e.g., a 30 cm (12″) center plant in the lower box and 10–15 cm (4–6″) spacing for small annuals in troughs.
- Mounting and placement: Secure troughs to the pallet face with screws through the back supports. Place the finished planter against a wall or fence for stability, or anchor to the ground if free-standing.
Watering, feeding and seasonal schedule (precise)
Consistency helps plants establish and leverages the wood’s insulating effect. Expect establishment in about 4–8 weeks after planting.
- Spring & Fall: Water 2–3 times per week (depending on local rainfall) until established. Top-dress with 2–3 cm (¾–1¼”) of compost in early spring each year.
- Summer: Shallow troughs will dry faster—water every other day to every 3rd day in hot, sunny conditions. Lower box typically needs water 1–2 times per week.
- Fertilizer: Apply a balanced slow-release granular fertilizer (N-P-K 10-10-10) at the manufacturer’s rate once in spring. For continuous bloomers, use a water-soluble feed at half label strength every 3–4 weeks from late spring through summer.
- Maintenance: Reapply protective wood coat once yearly in spring. Replace or refresh the soil in the troughs every 18–24 months and the lower box soil every 2–3 years.
Practical tips from experience
- Use breathable liner: A landscape fabric lining balances moisture retention and drainage better than full plastic liners and reduces wood rot while keeping roots healthy.
- Choose plants by pocket depth: Troughs (10–12 cm) suit trailing petunias, calibrachoa, succulents or small herbs; lower box (25–30 cm) suits larger annuals, small shrubs or mixed foliage combos.
- Fasten smart: Use stainless or hot-dipped galvanized fasteners to prevent rust stains and prolong the pallet life.
- Microclimates: The wood’s thermal mass buffers temperature swings; position the planter where you want slightly warmer night temps—this helps bloomers extend the season.
Common mistakes to avoid
- Using unknown chemical-treated pallets: Do not use pallets stamped “MB” or visibly contaminated boards—these can leach harmful residues into soil and plants.
- Skipping a liner: Direct soil contact accelerates rot, can cause tannin staining, and increases the risk of contamination—always line troughs and boxes.
- Overly compacted soil: Packing the soil reduces drainage and oxygen for roots. Use the recommended mix and avoid heavy compaction.
- Planting deep-rooted species in shallow troughs: Roots will become root-bound and stressed. Match plant roots to pocket depth.
Conclusion and call to action
Upcycling a pallet into this tiered planter maximizes small-space planting by combining the insulating, breathable qualities of pallet wood with smart lining and soil choices. Follow the selection, lining, soil mix and seasonal care steps above and expect healthy establishment within 4–8 weeks. Ready to build? Gather one clean HT-stamped pallet, a roll of landscape fabric and the soil ingredients—then share a photo of your planter after its first season of blooms!