Easy Way To Grow Tomato Plant in Plastic Hanging Bottles | Growing Tomatoes from Seed
Easy Way To Grow Tomato Plant in Plastic Hanging Bottles | Growing Tomatoes from Seed
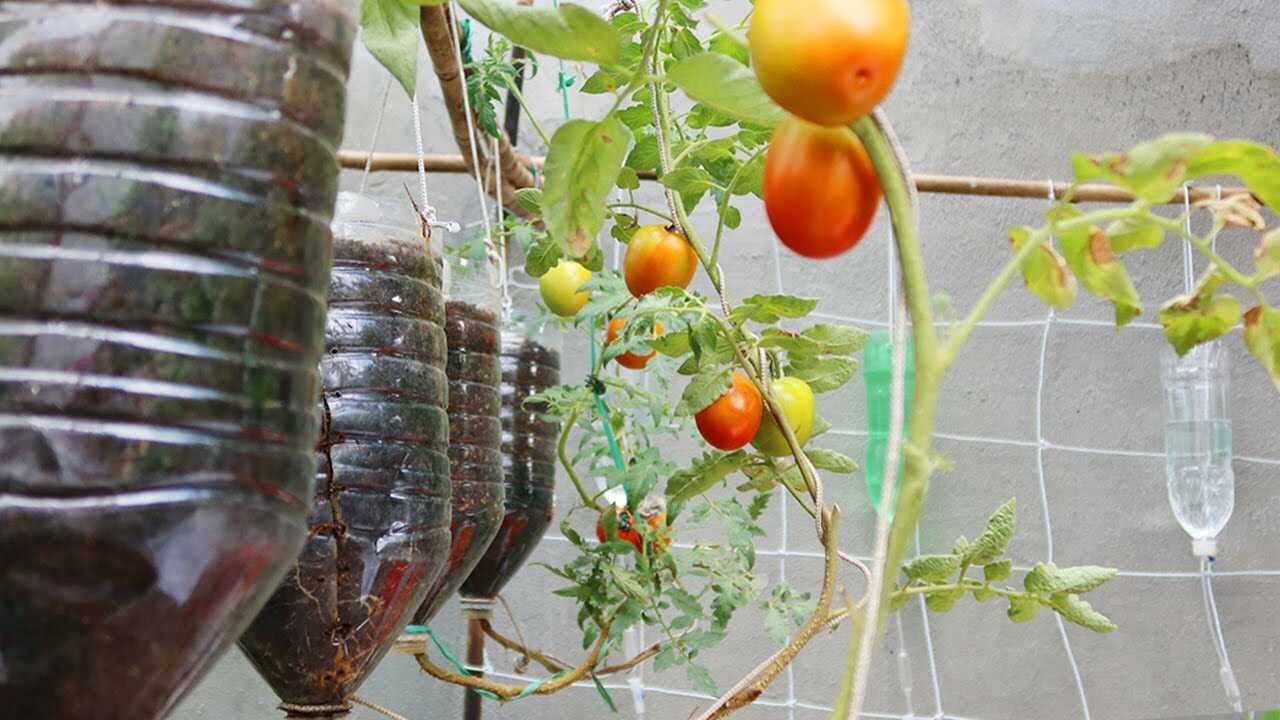
In the photo you can see a row of clear 2‑liter plastic hanging bottles filled with dark potting soil and trailing tomato vines. This simple, space‑saving system turns single bottles into individual planters with good drainage and airflow — ideal for balconies, small yards, or vertical gardens. Below I’ll walk you through exactly how to recreate this setup, why it works botanically, and the precise doses and schedule to get healthy tomato plants and fruit in containers.
Why plastic hanging bottles work for tomatoes (botanical rationale)
- Root volume and aeration: A 2‑liter bottle provides ~1.5–2 L of soil volume — enough for small determinate varieties or young indeterminate vines when trained properly. Good aeration prevents root suffocation and reduces root rot risk.
- Drainage control: Bottles are easy to add drainage holes to; consistent drainage prevents waterlogging, which is a primary cause of fungal disease and poor uptake of calcium (leading to blossom end rot).
- Microclimate and warmth: Hanging bottles warm up quickly in sun, promoting root activity and faster fruit set compared with heavier ground beds in cooler microclimates.
- Water and nutrient management: Small containers require disciplined, regular watering and feeding — which makes nutrient control easier and reduces wasted fertilizer runoff when done correctly.
Materials and precise preparations (what to use and how)
- Clean 2‑liter clear plastic bottles (one per plant).
- Sharp knife or scissors, awl or 4–5 mm drill bit for holes.
- Strong twine or polypropylene rope, small carabiner or hook rated for 5 kg per bottle.
- High‑quality commercial potting mix, mature compost, and perlite or coarse horticultural sand.
- Slow‑release granular fertilizer (balanced N‑P‑K ~14‑14‑14) and a water‑soluble tomato fertilizer for side‑dressing.
Soil mix (precise dose for a 2‑L bottle): mix 3 parts potting mix : 1 part mature compost : 0.5 part perlite. This fills a 2‑L bottle with about 1.5–1.8 L of media and gives good fertility and drainage.
Step‑by‑step: make the hanging bottle planter
- Cut the bottle: cut the bottle about one third down from the cap. Use the bottom half as the planter, or use the top inverted into the bottom to create a self‑watering wick. In the pictured setup, the bottom halves are used as planters and hang upright.
- Make drainage and aeration holes: punch 6 holes (4–6 mm) around the lowest point of the bottle and 2 small air holes near the top side. Good drainage holes prevent waterlogging.
- Attach hanger: punch two holes near the bottle rim and thread strong twine through, knot securely. Test the knot: a filled bottle will weigh ~3–4 kg when wet, so use a hanger rated above that weight for safety.
- Fill with soil mix: pack the prepared soil mix into the bottle, leaving ~3–4 cm headspace for watering.
- Plant: transplant a seedling when it is 4–6 weeks old and has 2–3 true leaves. Plant deeply — bury stem up to the first true leaves to promote root formation along the buried stem.
- Position and support: hang bottles 30–40 cm apart on a horizontal rod or trellis. For indeterminate varieties, run a vertical string from the bottle neck to overhead support and tie the main stem to it as it grows.
Watering and feeding — exact doses and frequency (seasonal)
- Water volume per session (2‑L bottle): Cool season (spring/fall): 150–300 ml every 4–6 days. Warm season (late spring/summer): 300–500 ml every 1–3 days depending on temperature and sun exposure. Always water until a little drains from bottom holes.
- Slow‑release fertilizer at planting: mix in 2 tablespoons (≈25–30 g) of a balanced granular (14‑14‑14) into the soil of each bottle at transplant.
- Liquid feeding: from 2 weeks after transplant, apply a water‑soluble tomato fertilizer at half strength every 10–14 days (or follow label for “half strength” if that is what you use). Example: if label recommends 1 teaspoon per liter, use 0.5 teaspoon per liter and apply 200–300 ml per bottle.
- Calcium management: to reduce blossom‑end rot risk, keep moisture steady and add slow calcium: mix 1 tablespoon crushed clean eggshells into each bottle at planting. If blossom end rot appears, apply a calcium foliar spray labeled for tomatoes per product directions (follow manufacturer dose).
Pruning, training and pollination
- Indeterminate varieties: pinch out side‑shoots (suckers) weekly to focus energy on one or two main stems. Train the main stem to its vertical support with soft ties every 10–14 cm.
- Determinate varieties: minimal pruning; remove only dead or crowded leaves to improve airflow.
- Pollination: gently shake or tap flowering clusters early each morning or use a small handheld fan for 1–2 minutes to improve pollination if bees are scarce.
Common mistakes to avoid (real botanical pitfalls)
- Overwatering: In small containers, constant wetness causes root oxygen loss and fungal problems. Always ensure drainage and wait until the top 1–2 cm of soil begins to dry before the next deep watering.
- Using garden soil: Heavy garden soil compacts in bottles, restricting roots and reducing drainage. Use a light potting mix as specified above.
- Wrong variety choice: Don’t put vigorous indeterminate giants in tiny bottles without very frequent feeding and larger volume; choose compact/determinate or patio varieties for the smallest bottles.
- Ignoring nutrient timing: Too much nitrogen late in the season gives leafy plants and few fruits. Switch to a bloom/fruit feed (lower N, higher P/K) when fruit sets in several weeks after transplant.
- Poor hang support: Underestimating weight will cause falls — use secure hangers and check knots weekly.
Troubleshooting quick guide
- Yellow lower leaves + slow growth: possible nitrogen deficiency — feed with balanced water‑soluble fertilizer at half strength once, then resume schedule.
- Blossom end rot (dark spot on fruit bottom): inconsistent moisture or calcium shortage — keep watering regular and add calcium source as described; allow several weeks to see improvement in new fruit.
- Leaves with powdery or fuzzy growth: reduce humidity, improve airflow, remove affected leaves, and avoid overhead watering; expect recovery over several weeks with corrected conditions.
Expected timeline
From seed: germination in 5–10 days, seedlings ready to transplant at 4–6 weeks. After transplant, expect fruit set and first ripe tomatoes in 8–14 weeks depending on variety and growing conditions — allow several weeks for roots to establish in the bottles and for flowers to develop into fruit.
Final tips and call to action
This hanging bottle method is a low‑cost, scalable way to grow tomatoes where space is limited. Use sturdy bottles, a well‑draining soil mix, disciplined watering, and regular feeding to keep plants productive. Start with compact varieties if you’re new to container tomatoes, and track water and feed every week for the best results.
Ready to try it? Gather a few clean 2‑liter bottles, your potting mix, and a young tomato seedling — and hang your first bottle today. Share your progress after several weeks and I’ll help you troubleshoot anything that comes up.