Grow Tomatoes in Containers for Fresh Harvests All Year! Try This Method
Grow Tomatoes in Containers for Fresh Harvests All Year! Try This Method
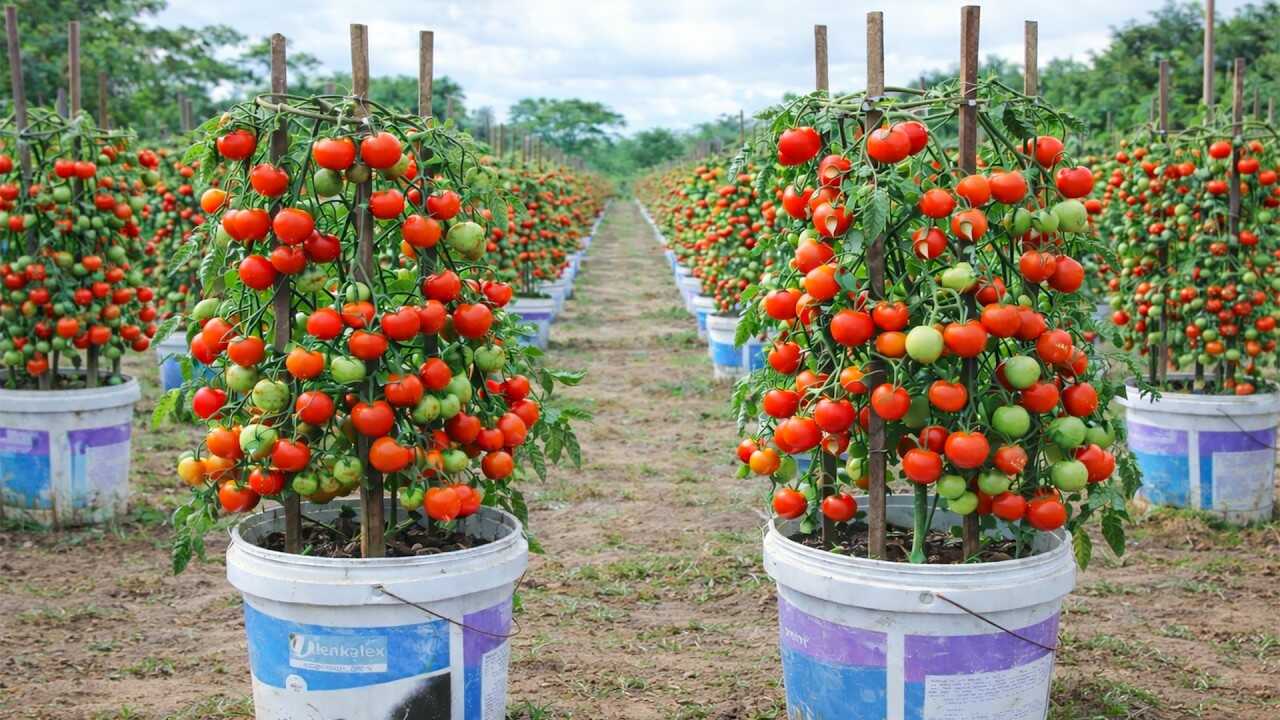
In the photo you can see vigorous tomato plants grown in white plastic 5‑gallon buckets with wooden stakes and heavy fruit set. This method—using a sturdy bucket as the container—gives tomatoes the root volume they need while keeping plants mobile, dripable, and easy to manage. Below is a practical, step‑by‑step container system built around the bucket you see.
Why a 5‑gallon bucket works
The bucket in the image provides roughly 15–20 liters of root space, a volume that supports healthy tomato root growth and stable nutrient uptake. In containers this size you can maintain a balanced moisture regime, supply targeted nutrition, and control soilborne problems. Buckets are inexpensive, easy to modify for drainage, and simple to stake or cage.
Materials you’ll need (based on the image)
- One 5‑gallon plastic bucket (clean, food‑grade preferred; if reusing a painted bucket, wash thoroughly and line or use new potting mix).
- Three 36–48″ wooden stakes or a short tomato cage (the photo shows stakes forming a support structure).
- High‑quality potting mix, well‑rotted compost, and perlite for drainage.
- Mulch (2–3 inches) and soft plant ties.
- Drill and 1/2″ drill bit or hole punch for drainage holes.
Step‑by‑step: prepare and plant
- Clean the bucket: scrub oil/paint residue. If it’s not food‑grade, line the bottom with landscape fabric or use a heavy potting mix and avoid direct contact with questionable residues.
- Make drainage: drill six 1/2″ holes evenly around the bottom and four 1/2″ holes about 2″ above the bottom for air pruning and faster drainage.
- Mix the potting blend: combine 60% high‑quality potting mix, 30% well‑rotted compost, and 10% perlite or coarse sand. Fill the bucket leaving 3″ from the rim for watering.
- Add starter nutrition: at planting, mix in 1/2 cup (about 120 ml) of well‑rotted compost and 1 tablespoon of a balanced granular organic fertilizer (e.g., 5‑5‑5) into the top 6″ of mix per bucket. This provides an initial nutrient reserve without burning roots.
- Planting depth: plant a young tomato seedling deep—bury stem up to its first true leaves to encourage strong basal root development (tomatoes root from buried stems).
- Install the stakes: push three stakes into the soil around the plant to form a tripod or use a stout cage. Tie the main stem to the stakes every 8–10 inches with soft ties as the plant grows (photo shows close, repeated tying to support heavy fruit clusters).
- Mulch: apply 2–3 inches of shredded bark or straw to the top to conserve moisture and reduce soil splash from rain or watering.
Feeding and watering (precise doses and timing)
- Watering: in warm weather (late spring–summer) water every morning with 1–2 liters (approx. 1–2 quarts) per plant, or until water runs from the bottom. Check soil—if the top 2″ dry out between waterings, increase frequency. In cool weather reduce to every 2–3 days. Consistent moisture prevents blossom end rot.
- Liquid feed during growth: once flowers set, give a liquid feed every 10–14 days: make a compost tea (1 part compost : 5 parts water, steep 24–48 hours) and apply 1 quart (about 1 liter) per plant as a soil drench, OR use fish emulsion at 1 tablespoon per gallon of water applied every 10–14 days during active growth and fruiting.
- Slow‑release top up: at mid‑season (6–8 weeks after planting), add 1 tablespoon of balanced granular fertilizer worked lightly into the top 1″ of soil per bucket to maintain steady nutrient supply.
Seasonal notes for year‑round harvesting
To extend harvests year‑round you must control temperature and light. In warm climates, buckets can stay outside year‑round. In cooler zones, move buckets indoors or into a greenhouse before frost. Expect fruiting several weeks after flowering—plan on at least 8–12 weeks from transplant to first reliable harvest in average conditions. For continuous production, stagger transplants every 3–4 weeks during the main season.
Practical tips from experience
- Use determinate varieties if you want compact, predictable yields; choose indeterminate varieties if you prefer continuous harvests and don’t mind more staking.
- Rotate crops by not reusing the same soil without solarizing or replacing it; buckets make rotation simple—replace potting mix yearly for disease control.
- Anchor stakes by driving them through the bucket bottom into the ground if frost or wind is a concern. That keeps heavy, fruit‑laden plants upright like in the photo.
- Keep leaves dry when watering to reduce fungal disease; water at the soil level and mulch well.
Common mistakes to avoid
- Using garden soil: heavy garden soil compacts in buckets, suffocates roots, and reduces drainage—use a light potting mix as instructed.
- Poor drainage: failing to drill enough holes causes root rot. The image buckets have ample drainage—copy that.
- Overfertilizing early: too much soluble fertilizer at planting can burn roots and create lush foliage with poor fruit set. Start with modest, slow‑release nutrients and switch to periodic liquid feeds during fruiting.
- Irregular watering: inconsistent moisture leads to blossom end rot. Keep a regular schedule and mulch to even soil moisture.
Conclusion & call to action
The simple, visual secret in the photo is the humble 5‑gallon bucket—a perfect container when prepared right. With proper drainage, a light potting blend, regular feeding, and the tripod stake support shown, you can grow productive tomatoes in a small area and extend harvests through the seasons. Try one bucket this week: prepare the mix, drill the holes, plant a young seedling, and follow the watering and feeding schedule above. Share your first harvest photo and I’ll help troubleshoot or optimize your setup!