Growing Celery is very simple with just a few small plastic bottles and lush vegetables
Growing Celery is very simple with just a few small plastic bottles and lush vegetables
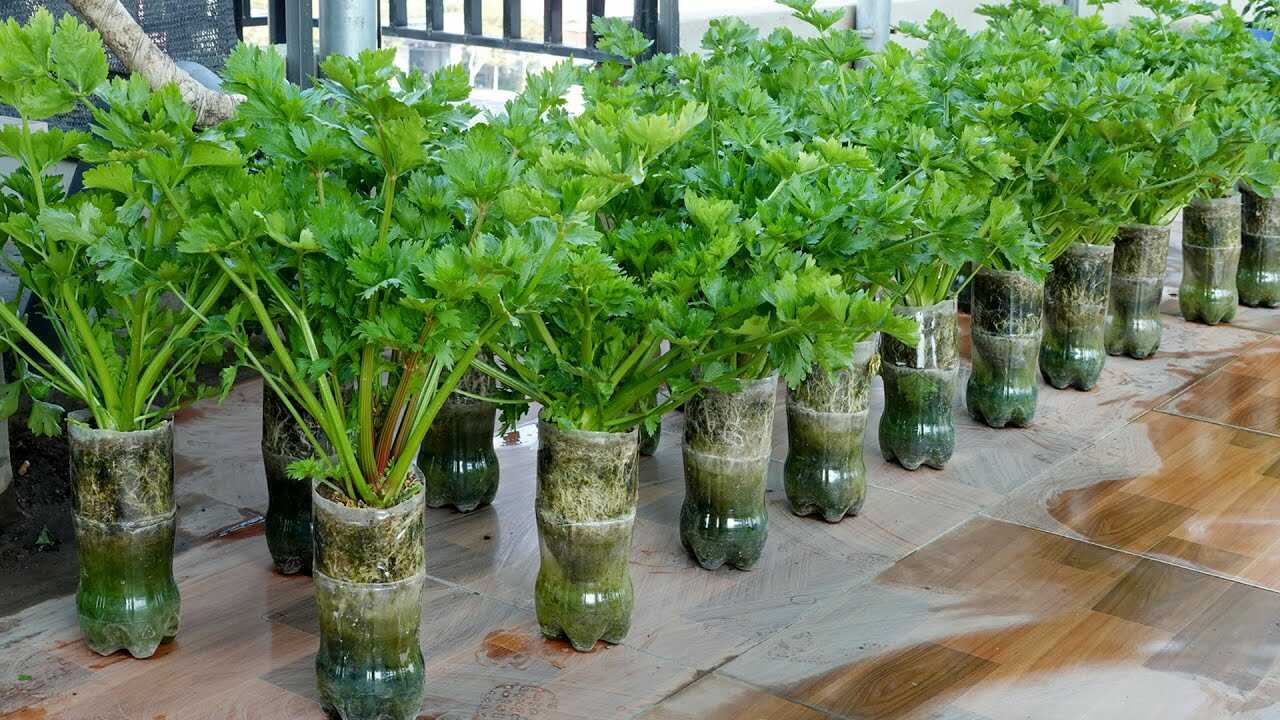
What you see in the photo are rows of healthy **celery crowns** grown inside cut **plastic soda bottles** that act as mini-reservoirs. The clear bottles show dense white roots and a bit of green algae on the sides — a telltale sign of a water-based, low-cost system that is perfect for **urban gardening**. This article walks you through a safe, factual method to regrow and grow celery using those exact small plastic bottles.
Why plastic bottles work for celery
Celery readily regrows from its base because it produces new shoots from meristematic tissue at the crown when kept moist and supplied with nutrients. Using a clear plastic bottle gives a stable **water reservoir**, visible root development and easy handling. A few botanical facts to justify this approach: celery is a **highly water‑dependent, shallow‑rooted** leafy vegetable, and keeping roots consistently moist promotes cell expansion and steady leaf production. This method supplements normal care (light, temperature, drainage) — it is not a miracle cure.
Materials and preparation (exact and practical)
- Plastic bottles: 1.5–2 L PET soda bottles, one per crown. Remove labels and rinse.
- Cutting guide: Cut the bottle roughly one third from the top so the bottom portion is 10–15 cm tall (use the bottom piece only).
- Cleaning: Soak bottles 5 minutes in a 1:9 bleach:water solution, rinse thoroughly and air dry.
- Celery crowns: Use the leftover base of a grocery celery bunch (2–4 cm tall base) or nursery-grown starter plants.
- Fertilizer: Water‑soluble balanced fertilizer (e.g., 20-20-20). Prepare at quarter strength: 1/4 teaspoon (~1.25 mL) per liter of water, or follow manufacturer’s instructions for a quarter-strength solution.
Step-by-step: Bottle method for water or semi-soil culture
Choose either pure water regrowth (hydroponic-style) or a soil-filled bottle acting as a pot with a water reservoir. Both are visible variations in the photo; pick the one that suits your space.
Method A — Water regrowth (best for quick root development)
- Fill the prepared bottle bottom with clean tap water to about 2/3 full.
- Place the celery crown so the base is touching water but leaves remain above the rim. Support the crown with a small foam ring or folded paper towel if needed.
- Add the quarter-strength fertilizer to the water every time you replace the solution.
- Top-up water every 2–3 days to keep the level consistent; replace the entire solution every 7–10 days to avoid stagnation and buildup.
- Expect visible root growth in several weeks (typically 3–6 weeks). Once roots reach 5–8 cm and new leaves are vigorous, transplant to a larger pot or leave in bottles for continuous leaf harvest.
Method B — Soil-in-bottle (bottom reservoir + media)
- Drill or punch 3–4 small drainage/aeration holes near the base to prevent waterlogging if you use soil.
- Fill the bottle with a mix: 60% quality potting mix + 20% perlite + 20% compost for steady nutrients and drainage.
- Plant the celery crown so the base sits just at soil level. Add 2–3 cm of soil above the crown if you want blanched stalks later.
- Keep a shallow reservoir of water beneath the soil by adding a little water to the bottle bottom (do not submerge the soil). Water the soil from the top once the surface begins to dry—generally every 2–4 days in warm weather.
- Feed with quarter-strength water-soluble fertilizer once every 7–10 days during the active growing season (spring–summer); reduce to every 14–21 days in cool seasons.
Light, temperature and seasonal dosing
- Light: Provide 4–6 hours of bright, indirect sun for steady leaf growth; direct hot midday sun can overheat water-filled bottles and encourage algae.
- Temperature: Ideal range 15–24°C (60–75°F). Growth slows below 10°C and above 30°C.
- Fertilizer frequency: Quarter-strength solution every 7–10 days in spring/summer. In fall/winter, feed every 14–21 days and keep plants cooler and well-lit.
Practical tips from experience
- To limit algae (visible on bottles in the photo), wrap the bottle sides with a strip of opaque tape or paint the exterior with a removable food-safe coating — roots will still develop, but light for algae will be reduced.
- Use fresh water or solution replacements regularly; dark, smelly water indicates anaerobic conditions and risk of root rot (Pythium).
- Keep bottle rims smooth — sand cut edges or cover them with duct tape to protect stems and your hands.
- If growing many bottles, rotate them occasionally so every plant gets even light and airflow for uniform growth.
Common mistakes to avoid
- Over-concentrated fertilizer — never use full-strength hydroponic or garden fertilizer in your bottles. Stick to the quarter-strength guideline to prevent leaf burn and salt buildup.
- Letting water go unchanged for more than 10 days — this encourages pathogens and algae that compete with roots for oxygen.
- Planting too deep or burying the crown — celery crowns need access to light and air at the base; burying leads to rot.
- Using hot direct sun on clear bottles — this can overheat the water and stress roots. Provide bright, indirect light when possible.
When to harvest and how to transplant
Expect steady regrowth over several weeks. New leaf clusters and firm stalks typically become usable for light harvests after 6–10 weeks depending on season and conditions. If you want larger stalks, transplant rooted crowns to a deeper pot or bed once roots are robust (5–8 cm) — do so gently and keep soil consistently moist for the first 2 weeks after transplant.
Conclusion — small bottles, big results
With nothing more than cleaned plastic bottles, consistent moisture, and modest quarter-strength feeding, you can reliably regrow and produce lush **celery** on a balcony or windowsill. This technique is economical, scalable and ideal for beginners. Try a few bottles this season, observe root development over several weeks, and adjust light and feeding — you’ll be harvesting fresh stalks and saving stems from the grocery store in a couple of months. Ready to cut a bottle and start your row?