Growing Hydroponic Vegetable Garden at Home – Easy for Beginners
Growing Hydroponic Vegetable Garden at Home – Easy for Beginners
Intro: what you see in the photo and why it matters
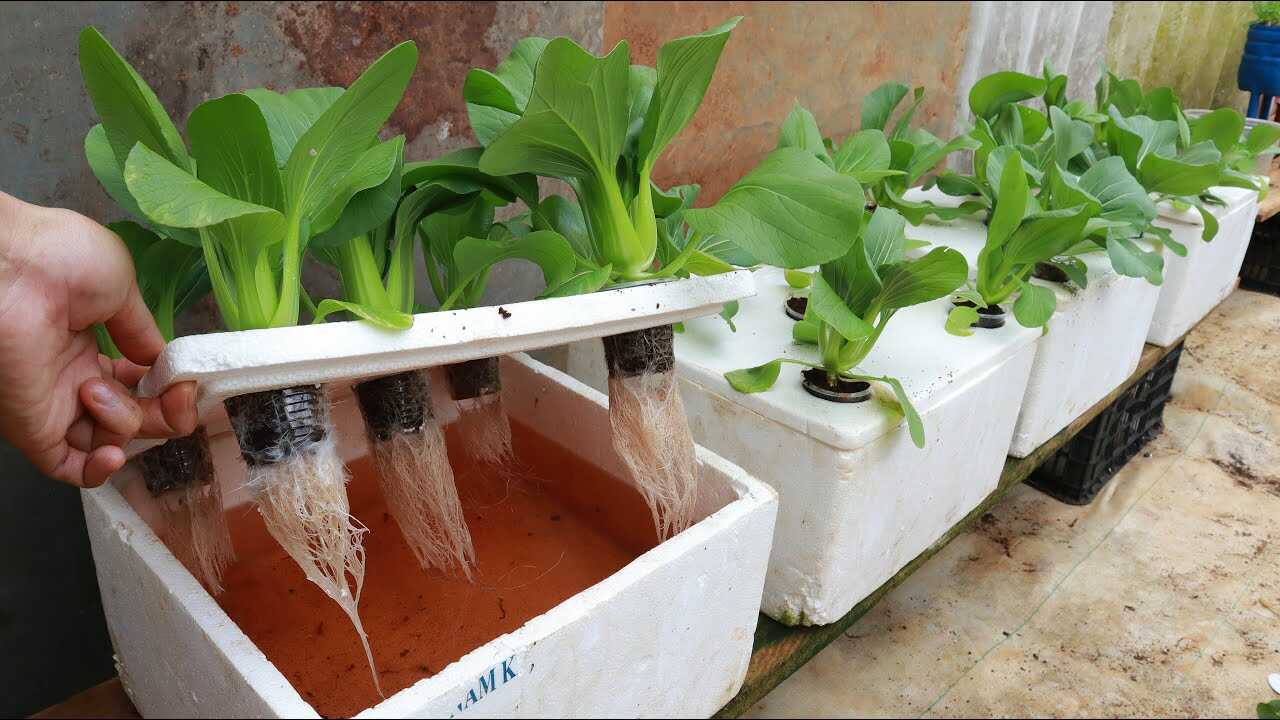
The photo shows young leafy vegetables (looks like bok choy) sitting in **net pots** that are held by a white **expanded polystyrene (EPS) foam — commonly called styrofoam — reservoir lid**. Roots hang down into an orange-tinted nutrient solution in a styrofoam box. That white foam is not just a DIY convenience: as an **insulating, opaque, lightweight reservoir**, it directly affects root temperature, light exposure and the risk of algae — all critical for healthy hydroponic growth.
Why use styrofoam (EPS) boxes for home hydroponics
Styrofoam is widely used in DIY hydroponics because it is **inert** under normal conditions (does not react with dilute nutrient solutions), **opaque** (reduces algae growth), and **insulating**, helping keep the nutrient solution at a stable temperature. Stable root-zone temperature and low algae competition support better **root respiration and nutrient uptake**, which are verifiable plant physiological principles. That said, take simple safety steps (lined surfaces, shaded placement) to avoid heat exposure or contamination.
Step-by-step: build and run a simple DWC system using a styrofoam box
- Materials: 1 clean styrofoam box (insulated cooler style), 6–12 net pots (2–3″ for seedlings), inert growing medium (rockwool or clay pebbles), air pump + air stone, hydroponic nutrient solution, pH meter, EC/TDS meter, drill or heated metal rod to make holes, shade cloth or place out of direct sun.
- Prepare the box: Cut holes in the lid sized to snugly accept your net pots. Line the inside with a food-safe pond liner or a clean 0.5 mm polyethylene sheet if you are concerned about EPS contact with the solution. Disinfect: rinse first, then wipe the lid and edges with a 1:9 household bleach:water solution, rinse thoroughly and air dry.
- Set up aeration: Place an air stone on the bottom of the reservoir and run an air pump continuously. Good dissolved oxygen is essential for healthy, white roots like in the photo.
- Mix the nutrient solution: For leafy greens (bok choy, lettuce, pak choi) target an electrical conductivity (EC) of 1.2–1.8 mS/cm (roughly 700–900 ppm depending on your meter). Use a complete hydroponic nutrient (follow the product label to reach the EC range), then adjust pH to 5.8–6.2. Example workflow: fill reservoir with dechlorinated water, add nutrient gradually while stirring, measure EC until 1.5 mS/cm, then adjust pH to 5.8–6.2 with pH down/up as needed.
- Planting: Place seedlings in net pots with rockwool or clay pebbles. Ensure the bottom of the net pot sits just above the water surface so roots can reach the nutrient solution but the crown is not submerged.
- Temperature and light: Keep nutrient solution between 18–22°C (64–72°F) for cool-season leafy greens. Provide 12–16 hours of bright light per day (natural sunlight or LED grow lights) and avoid direct midday sun on the styrofoam box to prevent overheating.
- Monitoring & maintenance: Check pH and EC twice weekly. Top up with fresh water to maintain reservoir level every 3 days in hot weather and every 7 days in cool weather. Completely replace the nutrient solution every 14 days in spring/summer, and every 28 days in fall/winter.
Practical care tips from experience
- Keep the reservoir shaded and insulated — EPS helps, but direct sun can still heat the solution and stress roots. Wrap the box with reflective or insulating material if needed.
- Use continuous aeration. Roots shown in the image are long and white because they received steady oxygen; a strong air pump and clean air stones prevent root suffocation and anaerobic pathogens.
- Measure, don’t guess. Use a reliable EC/TDS meter and pH meter. Adjust nutrients to keep EC in the target range rather than adding “a little” fertilizer.
- Dechlorinate your tap water before adding nutrients (let it sit 24 hours or use an activated carbon filter) — chlorine can harm root microbes and tender roots.
- Control solution temperature. If the box is outdoors in warm months, float a frozen bottle inside or use evaporative cooling; high temperatures reduce dissolved oxygen and accelerate root disease.
Common mistakes to avoid (real botanical consequences)
- Letting roots sit in stagnant, warm water. This reduces oxygen and promotes root rot (Pythium). Always aerate and maintain 18–22°C for leafy greens.
- Ignoring pH. If pH drifts outside 5.5–6.5, nutrient uptake is impaired and plants show deficiency symptoms despite enough fertilizer.
- Using unshaded styrofoam in full sun. The reservoir can overheat quickly, stressing roots and slowing growth.
- Over-concentrating nutrients. EC above recommended ranges causes osmotic stress and poor water uptake; young transplants need the lower end of the EC range.
- Reusing dirty EPS boxes without cleaning. Old biofilm and pathogens can cause repeat crop losses — disinfect and rinse before reuse.
Timeline and realistic expectations
With a properly aerated and maintained styrofoam DWC system, **leafy vegetables like bok choy or lettuce typically show vigorous root growth within 2–3 weeks and are ready to harvest in about 4–8 weeks**, depending on variety and light. Be consistent with checks: pH/EC twice weekly, top-ups every 3 days in summer (7 days in cooler months), and full solution changes every 14 days in warm seasons or every 28 days in cool seasons.
Quick checklist before you start
- Clean, lined styrofoam box and fitted lid with net pots
- Air pump + air stones running continuously
- Hydroponic nutrient mixed to EC 1.2–1.8 mS/cm for leafy greens
- pH adjusted to 5.8–6.2 and monitored twice weekly
- Reservoir shaded, solution temperature 18–22°C
Conclusion — get growing with confidence
That simple white styrofoam reservoir in the photo is an excellent starting point for a beginner-friendly hydroponic garden. When used correctly — shaded, lined if desired, aerated, and paired with measured nutrient management (EC 1.2–1.8 mS/cm, pH 5.8–6.2) — it supports healthy roots and fast leafy growth within several weeks. Start small, monitor regularly, and you’ll soon harvest your first hydroponic greens. Ready to try it? Gather your box, net pots and a reliable EC/pH meter, and take the first step today.