Growing Tomatoes in Bottles on Balcony for Fresh Fruit All Year
Growing Tomatoes in Bottles on Balcony for Fresh Fruit All Year
Introduction: what you can see and why it matters
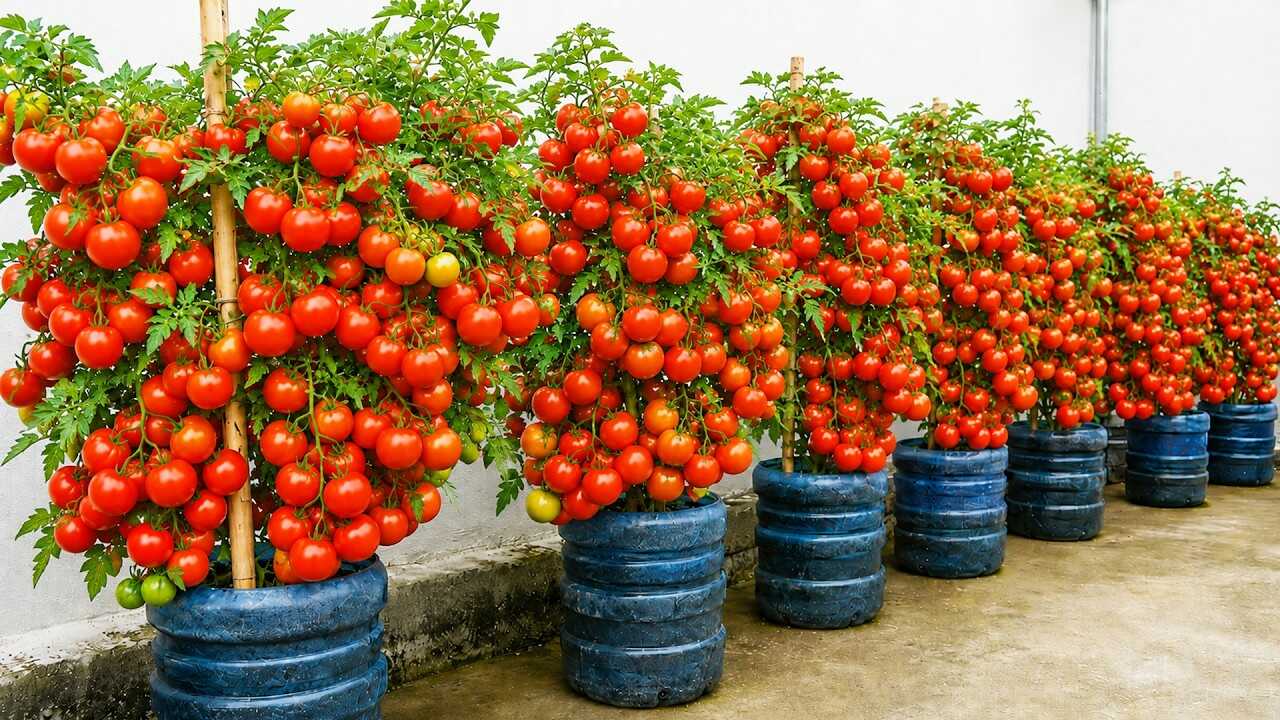
The photo shows prolific tomato vines trained from large blue plastic water bottles repurposed as planters. These are roughly 5‑gallon (≈19 L) plastic jugs cut and modified to become lightweight, durable containers with a built‑in reservoir. Using bottles like these on a balcony is a practical way to get steady moisture, mobility and high yields in a small space.
Why bottles work for balcony tomatoes (botanical facts)
Plastic bottles made of PET or HDPE are strong and light, which makes them easy to move into sun or shade. More importantly for plant physiology, a bottle converted into a self‑watering container provides a stable moisture supply to roots. Stable moisture helps tomatoes maintain steady calcium uptake, reducing the risk of blossom end rot — a well‑documented physiological disorder caused by irregular water uptake, not a pathogen. Bottles also let you control drainage and root depth precisely, which supports healthy fruit set when combined with correct light and feeding.
Step‑by‑step: turn a 5‑gallon bottle into a tomato planter
- Materials: one clean 5‑gallon (≈19 L) blue plastic water bottle, sharp utility knife or jigsaw, drill with 6 mm bit, 6–8 drainage holes, cotton wick (6 mm rope, 20–30 cm), 1 kg coarse gravel, quality potting mix, compost, perlite, bamboo stake (5–6 ft / 1.5–1.8 m), tomato seedling (determinate or compact indeterminate).
- Cut and clean: wash bottle thoroughly. Cut horizontally at about two‑thirds height so the top can be inverted into the bottom to create a reservoir/funnel. Smooth edges to avoid damaging the wick.
- Make the reservoir: drill 6 holes (≈6 mm) in the bottom section for overflow and air exchange. Add a 2–3 cm layer of coarse gravel to the bottom to keep the reservoir separate from the soil. Thread the cotton wick through a hole in the inverted top so one end dips into the reservoir and the other lies against the soil—this creates capillary watering.
- Soil mix (precise ratio): mix 3 parts high‑quality potting soil : 1 part mature compost : 1 part perlite. For a 19 L bottle use about 10 L of this mix (fill the soil section to within 5–7 cm of the rim where the inverted top will sit).
- Planting depth: transplant a healthy tomato seedling and bury to the first set of true leaves to encourage strong root development. One plant per bottle.
- Support: insert a 1.5–1.8 m bamboo stake next to the plant. Tie stems loosely as the plant grows to prevent wind damage on a balcony.
Watering, feeding and maintenance — exact doses and timing
- Watering with reservoir: after planting, fill the reservoir with 1–2 liters of water. Check reservoir weekly; in hot summer conditions top up every 7 days with 1–2 liters. In cooler months, top up every 2–3 weeks. Always ensure the soil surface dries 2–3 cm before heavy rewatering if not using the reservoir method.
- Fertilizer schedule: begin feeding when the first flowers appear. Use a balanced water‑soluble fertilizer (example label 10‑10‑10) at half label strength: mix 1/2 teaspoon (≈2.5 g) of fertilizer per liter of water. Apply 250 ml of that solution per plant every 10–14 days during the active growing/fruiting season. Once fruiting is underway, switch to a potassium‑leaning formula (example 5‑10‑20) at the same dilution and frequency to support fruit development.
- Light and temperature: aim for 6–8 hours of direct sun daily. For year‑round production on a balcony, supplement with a 12–16 hour daily schedule of LED grow light during short, low‑light months; expect slower fruiting in winter.
- Pruning: for indeterminate vines grown in bottles, remove suckers up to the first 3–4 clusters to concentrate energy. For determinate varieties, minimal pruning is needed.
Expected timeline
After transplanting expect several weeks for root establishment and about 8–12 weeks from transplant to first ripe fruits depending on variety and light. Maintain consistent watering and feeding; do not expect instant results — fruiting develops over months, not days.
Practical tips from experience
- Sanitize bottles: wash with mild bleach solution (1 part bleach : 9 parts water), rinse well and air dry before use to reduce carryover of pathogens.
- Prevent overheating: dark bottles can heat up on hot balconies; wrap exposed sides in reflective white tape or paint the exterior with light acrylic paint to reduce root stress on sunny afternoons.
- Mobility: bottles are light — move them to follow seasonal sun or protect from cold snaps. Use small caster trays if you need to roll several plants at once.
- Mulch the top: a thin layer (1–2 cm) of straw or shredded bark helps reduce surface evaporation and keeps soil temperature steadier.
Common mistakes and how to avoid them
- Too small a container: using a bottle under 10 L will limit root growth and yield. Stick to 15–20 L equivalent (5‑gallon style) for best results.
- Poor drainage: failing to make overflow/drain holes can suffocate roots and cause rot. Always include an overflow and check reservoir for stagnation.
- Inconsistent watering: erratic moisture is the main cause of blossom end rot. The bottle reservoir approach minimizes this — follow the top‑up schedule above.
- Overfertilizing: excess nitrogen gives lush foliage and few fruits. Use the recommended half‑strength schedule and switch to higher potassium when fruiting begins.
- Ignoring support: letting heavy clusters hang unsupported leads to broken stems and reduced yields. Tie to a sturdy stake as shown in the image.
Conclusion — get started this season
Repurposed blue 5‑gallon bottles are a proven, space‑saving container for balcony tomatoes when converted into a self‑watering system. They give you better moisture control, portability and the ability to grow productive vines even on small terraces. Follow the precise soil mix, reservoir and feeding schedule above, allow several weeks for fruiting, and treat the bottle method as a complement to proper light, drainage and pruning. Start with one bottle and a compact tomato variety this week — you’ll be harvesting in about 8–12 weeks.
Take action: gather one clean 5‑gallon bottle, quality potting mix, a compact tomato seedling and a bamboo stake. Convert the bottle into a reservoir planter tonight and plant by tomorrow to give your balcony a productive, mobile tomato tree.