Hanging Garden Growing Lettuce Without Watering, High Productivity
Hanging Garden Growing Lettuce Without Watering, High Productivity
Introduction — what you see and the simple trick
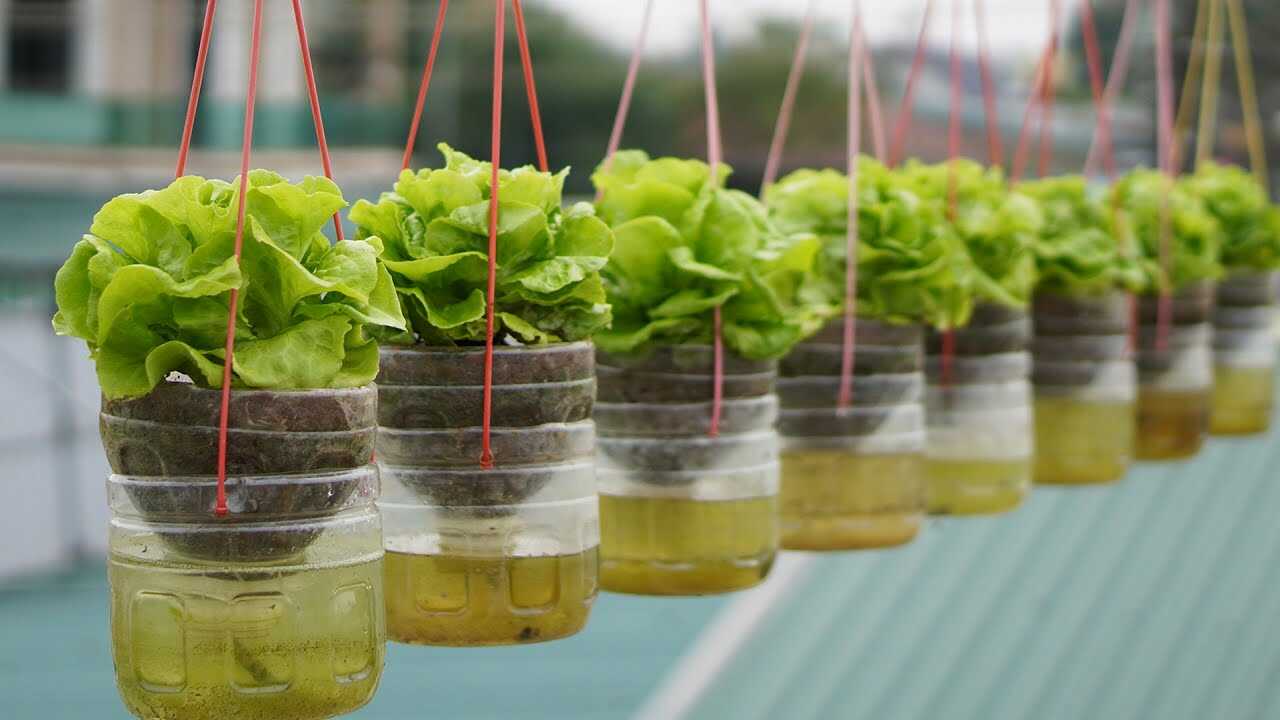
In the photo you can see a row of hanging **plastic bottle planters**: the top half holds a lettuce and potting mix while the bottom half is a clear reservoir with greenish water. That reservoir plus a small wick creates a **self-watering system** that keeps the root zone consistently moist. This article shows you, step by step, how to reproduce that exact bottle-wick method to grow **lettuce with minimal watering**, maintain high productivity, and avoid common mistakes.
Why a bottle reservoir works (botanical facts)
Plants like lettuce need steady moisture at the roots to produce tender leaves. A small reservoir under the substrate feeds roots by **capillary action**—a well-documented physical process—so the root zone remains moist without frequent surface watering. Consistent moisture reduces stress and supports vegetative growth because **nitrogen uptake** and cell expansion occur best when roots are not drying and rewetting repeatedly. The reservoir is a practical complement to sunlight, drainage and nutrition, not a miracle cure.
Materials and exact recipe (per 1.5–2 L plastic bottle)
- One clean plastic bottle (1.5–2 L), cut across about two thirds down so the top can sit inverted in the bottom.
- Wick: 15–20 cm of cotton rope or strip of cotton fabric (approx. 6–8 mm thick).
- Substrate: 700 ml total per planter: 70% coco coir, 20% mature compost, 10% perlite (mix thoroughly).
- Reservoir volume: keep roughly 250–400 ml of liquid in the bottom section (about 1/5–1/4 of a 1.5 L bottle).
- Nutrient routine: either compost tea at 1:9 ratio (1 part brewed tea to 9 parts water) or a water-soluble balanced fertilizer used at 25% of the manufacturer’s labeled rate.
- Drain/air holes: 3–5 small holes around the top inverted portion for air exchange; keep cap off or with a small hole to let the wick pass through.
- Hanging cord and a hook rated to hold the filled bottle.
Step-by-step assembly and planting
- Cut and clean: Cut the bottle about two thirds from the top. Rinse thoroughly to remove residues.
- Prepare the wick: Thread the cotton rope through the bottle cap or a small hole in the bottle neck so one end reaches the bottom of the reservoir and the other sits 2–3 cm into the substrate when assembled.
- Assemble: Place the inverted top half into the bottom half so the wick sits vertically between reservoir and substrate. Make sure the wick end in the reservoir is submerged when you fill it.
- Fill substrate: Add the prepared mix to the inverted top half, leave ~1.5–2 cm below the rim for planting.
- Plant: Transplant a 3–4 week-old lettuce seedling (or sow seeds thinly). One lettuce per bottle gives best leaf quality and airflow.
- Initial fill: Fill the reservoir with plain water first to let the wick prime for 12–24 hours, then add your nutrient solution (see dosing below).
- Hang and position: Hang where lettuce gets 10–14 hours of bright indirect sun (morning sun is best). Avoid intense afternoon sun that causes rapid water use and bolting.
Precise dosing, schedule and seasonal adjustments
Follow this refill and nutrient schedule for consistent results:
- Initial nutrient fill: After priming, add either compost tea diluted 1:9 (tea:water) or a water-soluble fertilizer at 25% of label strength to the reservoir.
- Top-up frequency: Check the reservoir weekly. In spring/fall (cooler season) refill/top up every 10–14 days. In warm summer, check and top up every 7–10 days because plant uptake is higher.
- Full solution change and cleaning: Every 4 weeks fully empty and rinse the reservoir and wick, then replace with fresh nutrient solution. This prevents oxygen depletion and excessive algae buildup.
- Expected timeline: Expect steady leafy growth and harvestable baby leaves in about 4–8 weeks depending on variety; full heads typically in 6–10 weeks. Growth occurs over several weeks, not days.
Practical tips from experience
- Use leaf (cut-and-come-again) varieties for fastest productivity and continual harvests from each bottle.
- Keep reservoirs partially shaded (or paint/cover them) to limit algae in the water—algae are harmless at low levels but they compete for oxygen and can clog the wick.
- Wick material: natural cotton works best; synthetic wicks are slower to wet. Replace the wick every 6–8 weeks if it becomes slimy or clogged.
- Airflow: space bottles so leaves don’t touch—good airflow reduces fungal issues.
- Fertilizer caution: never use full-strength hydroponic fertilizer in a small reservoir—dilute to 25% to avoid nutrient burn and salt buildup in the substrate.
Common mistakes to avoid
- Using heavy garden soil: it prevents capillary action and suffocates roots. Use a light, free-draining mix as described.
- Sealing the reservoir: completely sealing the bottom blocks gas exchange and leads to anaerobic water—always allow some air exchange and change solution monthly.
- Overcrowding: planting more than one head per small bottle reduces productivity and increases disease risk.
- Ignoring algae: heavy green water and slime indicate the reservoir needs cleaning—do not let it run unchecked more than 4 weeks.
- Expecting instant harvests: lettuce responds fast relative to many crops, but meaningful yields take several weeks—plan for regular care and harvesting rounds.
Conclusion and call to action
The simple plastic bottle reservoir you see in the picture is an effective, low-cost way to keep lettuce roots moist and productive with minimal daily watering. By using a small wick, a light substrate, regular dilute nutrition (compost tea or quarter-strength soluble fertilizer), and a disciplined refill/cleaning schedule (weekly checks; full change every 4 weeks), you can grow continuous, high-quality lettuce in a hanging garden over many weeks. Try assembling three bottles as a starter test this season—observe reservoir levels weekly and adjust sunlight or nutrient strength, then scale up once you see steady leaf growth.
Ready to build your first bottle planter? Gather one bottle, a cotton wick and the substrate mix, and start this weekend—your first baby leaves can be ready in a few weeks. Happy growing!