How to grow spinach in a new style at home
How to grow spinach in a new style at home
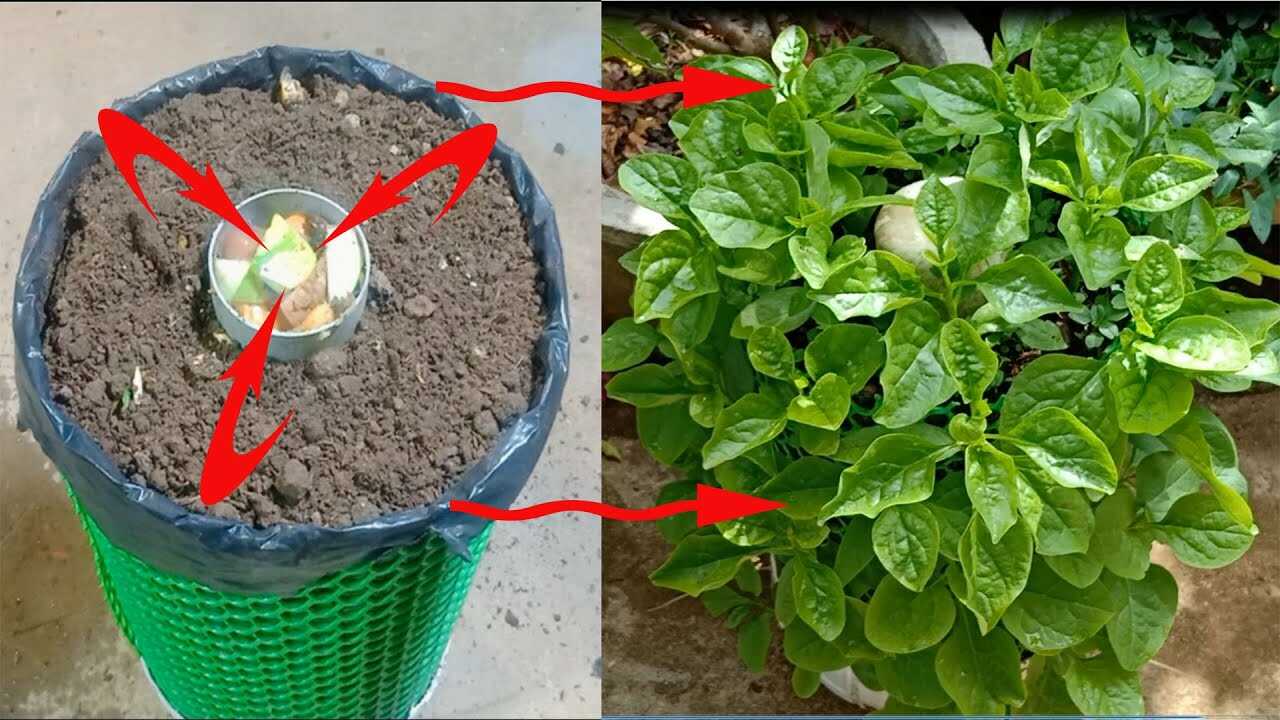
In the photo you can see a plastic container pot with a small central metal tube filled with kitchen scraps — most visibly potato peels and other vegetable cuttings. This article shows a practical, science-based method to grow vigorous spinach by using a central composting well (a “core compost tube”) to release nutrients slowly into the root zone.
Why potato peels and vegetable scraps work
Potato peels and other raw vegetable scraps are rich in organic matter and minerals such as potassium and small amounts of phosphorus and nitrogen. As these scraps decompose they feed soil microbes, improve soil structure and slowly release plant-available nutrients. This is a proven horticultural principle: adding decomposable organic material increases microbial activity and nutrient cycling—useful as a supplement to regular care, not a replacement for light, drainage and balanced fertilization.
Materials and preparation (what to use and exact doses)
- Container size: 15–25 L (4–6 gallon) pot for 4–6 spinach plants; scale up proportionally for larger pots.
- Central tube: a 7–10 cm (3–4 in) diameter PVC pipe or metal can, 15–20 cm (6–8 in) tall, open at both ends to form the compost well.
- Main ingredient: chopped potato peels and other vegetable scraps (no meat/dairy). Dose: 200–300 g (about 1 cup) per 20 L pot per application.
- Covering soil: potting mix or garden soil to fill the pot; add a cup (120 g) of mature compost mixed into the top 5–7 cm as starter microbes.
- Chopping: cut scraps into pieces roughly 1–2 cm to speed decomposition.
Step-by-step: plant spinach using a central compost tube
- Prepare the container: ensure good drainage holes. Add a 2–3 cm layer of coarse grit or broken pottery if you want extra drainage.
- Place the central tube upright in the pot center. Fill around the tube with quality potting mix, leaving 3–4 cm to the rim.
- Put 200–300 g of chopped potato peels and mixed vegetable scraps into the tube. Add a thin layer (a handful) of garden soil or mature compost on top of the scraps to inoculate microbes.
- Cover the pot surface with potting mix so the top of the tube is flush with soil, and spread an additional 1–2 cm soil layer to fully cover any exposed scraps (this prevents flies and scavengers).
- Sow spinach seeds around the central tube at recommended spacing (roughly 5 cm apart for baby leaves, 15 cm for full heads) or transplant seedlings.
- Water thoroughly through the soil surface first. Then pour 0.5–1 cup (120–240 ml) of water down the central tube to moisten scraps and accelerate decomposition. Repeat weekly to keep decomposition active.
Schedule, expected timeline and seasonal adjustments
During active, cool-season growth (spring and autumn): add 200–300 g of chopped scraps to the central tube every 3 weeks. Water the tube once per week with ~150–200 ml to help leach nutrients. Expect visible improvement in soil activity and plant vigor after 6–8 weeks. You can harvest baby spinach leaves in about 4–6 weeks, but the soil enrichment effect builds over several weeks.
In hot summer months reduce additions to every 6–8 weeks or stop entirely (spinach dislikes heat). In winter, reduce frequency as decomposition slows and plants grow more slowly.
Practical tips from experience
- Chop scraps small: 1–2 cm pieces decompose faster and avoid creating anaerobic pockets.
- Add a handful of mature compost or a spoonful of garden soil to the tube when adding new scraps—this introduces beneficial decomposers.
- Keep the top of the tube covered with soil (2–3 cm) after each refill to prevent flies and rodents.
- Maintain even moisture—spinach prefers consistently moist, not waterlogged, soil. Good drainage is essential.
- If you see vigorous leaf growth but pale color, supplement once with a dilute balanced fertilizer (half-strength) because decomposition releases nutrients slowly and may not meet all short-term N needs.
Common mistakes to avoid
- Overfilling the tube with large, whole scraps: this causes slow, smelly anaerobic breakdown. Chop and limit to 200–300 g per 20 L pot.
- Adding meat, dairy or oily scraps: these attract pests and create odor—never use them.
- Planting in hot weather expecting spinach to thrive: spinach is a cool-season crop; heat causes bolting and poor flavor.
- Neglecting drainage or overwatering: the combination of wet, compacted soil and decomposing scraps can produce rot; keep soil friable and well-draining.
- Using diseased potato scraps (blight-infected): dispose of diseased material—don’t add it to the tube.
Short troubleshooting guide
- Bad smell: remove some scraps, add dry brown carbon (shredded paper) and more soil; reduce water for a few days.
- Pests visiting the tube: ensure scraps are fully covered and use a fine mesh over the pot rim if rodents persist.
- Slow decomposition in cold weather: expect slower breakdown; wait longer between additions and reduce frequency.
Conclusion and call to action
This simple method uses a visible central well of potato peels and vegetable scraps to feed spinach steadily, increasing microbial activity and slowly releasing nutrients into the root zone. It’s an easy, low-waste technique that pairs well with good light, proper watering and well-draining soil. Start a test pot this season: add 200–300 g of chopped peels to your central tube, plant spinach around it, and observe the improvements over the next 6–8 weeks. Share your results and tweak amounts as you learn your garden’s rhythm—happy growing!