I don’t need to buy Potatoes at the market anymore, when I know this trick
I don’t need to buy Potatoes at the market anymore, when I know this trick
Introduction — what you see and why it matters
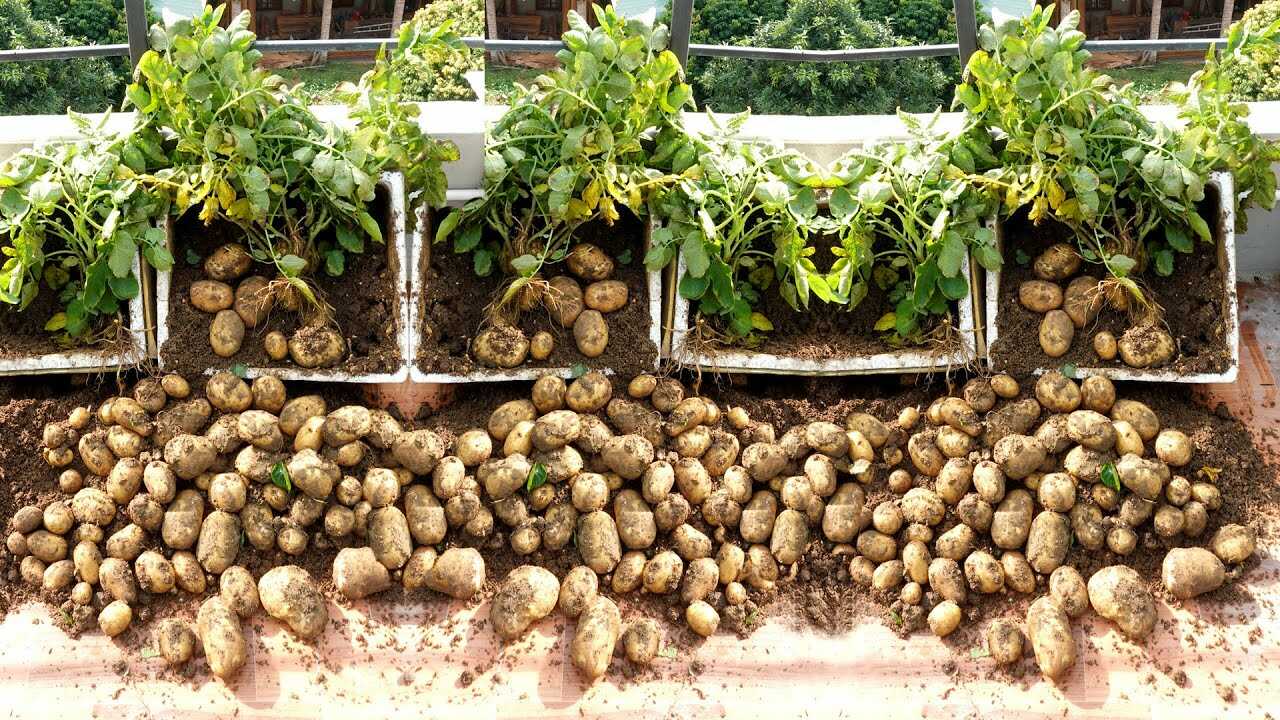
The photo shows piles of freshly dug potatoes pulled from rectangular containers on a balcony — leafy tops, loose soil and dozens of tubers. That image is the proof: with the right container method and a few horticultural details, you can reliably produce table potatoes at home. This article focuses on growing and multiplying potatoes from seed tubers in containers so you can stop buying them at the market.
The botanical trick, explained
Potatoes are tubers — swollen underground stems that store starch and contain visible buds called eyes. Each eye is a node that can sprout into a shoot and form new tubers on stolons. By using healthy seed potatoes (or tuber pieces with at least one eye), planting them in a loose, nutrient-friendly container mix, and progressively covering shoots (hilling) you force the plant to produce more tubers along the buried stems. This vegetative reproduction is reliable and repeatable — a real botanical property, not a gimmick.
Step-by-step: container potatoes that actually yield
- Choose seed tubers: Use certified seed potatoes when possible. If using supermarket potatoes, select firm tubers with several eyes; note many supermarket potatoes are treated with sprout inhibitors. Cut large seed potatoes into pieces of about 50 g (roughly 1.5–2 oz) each with 1–2 eyes, and let the cut surfaces dry and callus for 2–3 days.
- Chit for a head start: Place seed pieces in a cool, bright spot (not direct hot sun) for 2–3 weeks until short green shoots form. Chitting reduces time to harvest and helps you pick the healthiest sprouts.
- Container size and spacing: For containers, allow about 15–20 liters (4–5 gallons) per seed potato. Use long troughs or stackable rectangular boxes like the photo; plant one seed piece per 20 L unit or 2 in a very wide tray spaced ~30 cm apart.
- Soil mix: Fill containers with a loose, well-draining mix: 50% good loam or topsoil, 30% well-rotted compost, 20% coarse sand or perlite/coco coir. For one 20 L container mix (approximate): 10 L loam, 6 L compost, 4 L coarse material.
- Nutrients at planting (precise dose): Mix into each 20 L container: 1/2 cup (≈120 ml) well-rotted compost plus 2 tablespoons (≈30 ml) bone meal (phosphorus) and 2 tablespoons (≈30 ml) wood ash (potassium). These supplies support tuber set and bulking. Do not overload with fresh manure — it can promote scab and excessive foliage.
- Planting depth: Place the seed piece 10–15 cm (4–6 in) below the soil surface, eyes facing up. Cover with ~10 cm of the mix initially.
- Hilling/layering: When shoots reach 15–20 cm tall, add another 5–8 cm of soil over the stems (do not bury the leaves completely). Repeat every 10–14 days, adding soil or straw until the container is nearly full. Hilling encourages stolon formation and multiplies tubers along buried stem nodes.
- Watering: Keep soil consistently moist but not waterlogged. Aim for roughly 2–3 cm of water per week (adjust for heat). In containers this often means watering every 2–3 days in warm weather; reduce in cool/rainy periods.
- Fertilizer schedule: Side-dress with a balanced organic fertilizer or compost tea every 3–4 weeks while plants are building foliage. Once tuber bulking begins (about when plants flower), reduce high-nitrogen feeds — excess nitrogen promotes foliage at the expense of tubers.
- Harvest timing: For new potatoes, expect harvest in about 10–12 weeks after planting. For maincrop varieties allow 16–20 weeks until foliage dies back. These multi-week ranges are normal and depend on variety and weather.
- Post-harvest cure: Cure tubers in a cool, dark, ventilated place for 1–2 weeks to toughen skins before long-term storage. Store at 4–10°C away from light to avoid greening and sprouting.
Practical tips from experience
- Use lightweight containers (plastic or polystyrene boxes) for easy handling and good drainage; add holes in the base if needed.
- Straw mulch on top reduces watering frequency, keeps tubers clean and cuts light exposure that causes green skins.
- Rotate crops — don’t grow potatoes in the same container or spot year after year to reduce disease pressure; use fresh potting mix every two seasons.
- Monitor for pests such as Colorado potato beetle or aphids; hand-pick or use appropriate organic controls early.
- Variety choice affects timing and yield: early varieties give small “new” potatoes sooner; maincrop varieties bulk up for longer storage.
Common mistakes to avoid
- Overfeeding with high nitrogen after shoots form — this creates lush foliage but few tubers. Reduce N once flowering/tuber set begins.
- Planting too deep or never hilling — if stems are never covered you limit stolon formation and reduce yield. Follow the staged hilling schedule above.
- Using untreated supermarket potatoes without checking for disease — they may carry viruses or be treated with sprout inhibitors. Certified seed is safest.
- Poor drainage and waterlogging — potatoes rot in saturated media. Ensure containers drain freely and use a light mix.
- Exposing tubers to light during growth or storage — light produces solanine and greened potatoes that should not be eaten.
Conclusion — your next steps
What you see in the photo is repeatable: healthy leafy plants, staged hilling, and a good harvest of tubers. Start by chitting a few seed potatoes now, prepare 20 L containers with the soil mix and measured amendments above, and follow the hilling and watering schedule. In 10–20 weeks (depending on variety) you’ll be digging your own potatoes and cutting down supermarket trips. Try one container first, refine details for your balcony microclimate, and expand when you’re confident — your future harvests will thank you.