Planted Like That Orchids Grow Fast. Flowers Bloom Profusely and Never Root Rotten
Planted Like That Orchids Grow Fast. Flowers Bloom Profusely and Never Root Rotten
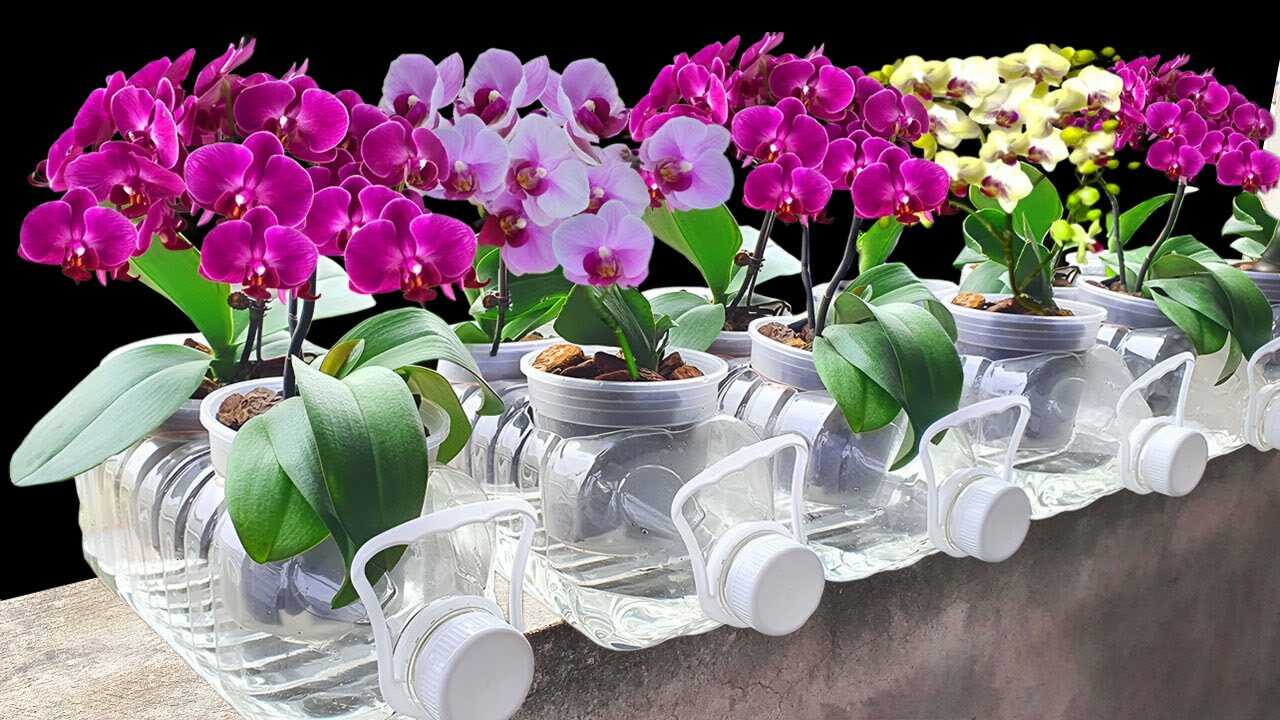
In the photo you can see **Phalaenopsis orchids** sitting in small nursery pots placed over clear plastic water jugs (transparent PET containers) half-filled with water. The clear jugs act as a low-cost **water reservoir / humidity tray** under each pot. This article explains exactly how to reproduce this setup safely, why it helps orchids, precise doses and timing, and common mistakes to avoid.
Why a clear water-jug reservoir helps orchids (the botanical facts)
Phalaenopsis are epiphytic orchids adapted to warm, humid air and a free-draining root environment. A clear water jug filled below the pot surface creates a stable microclimate by increasing local **relative humidity** and buffering rapid temperature swings. Higher ambient humidity reduces transpiration stress on leaves and roots, supporting steady growth and better flower retention. Importantly, the method increases humidity without permanently waterlogging the potting medium—if you maintain a safe water level below the pot base.
Materials and exact preparation (step-by-step)
- Materials: clean transparent PET water jugs (2–5 L), 6–8 cm plastic nursery orchid pots with drainage, coarse fir bark or grade-A orchid bark, sterile scissors/utility knife, sandpaper or file, distilled or rainwater, pH-neutral orchid fertilizer.
- Cut and fit the reservoir: For a standard 6–8 cm pot, cut a circular hole in the top of the jug about 6–7 cm across so the nursery pot rim sits snugly in the opening. Smooth edges with sandpaper to avoid cutting the pot or roots.
- Sanitize: Rinse jugs in hot water and a mild bleach solution (1 part household bleach to 9 parts water), rinse thoroughly three times with clean water to remove bleach residue, then air dry.
- Potting: Use coarse orchid bark only (no garden soil). Place the orchid in its nursery pot with bark packed so roots have air pockets. Do not add sphagnum that retains too much water for this setup.
- Water level: Fill the jug so the water surface is maintained 2–3 cm below the bottom of the nursery pot. This creates high local humidity and evaporative cooling but prevents direct, constant submersion of roots.
- Placement: Slide the nursery pot into the jug opening so it sits stable and upright. Keep jugs on a stable ledge with good indirect light and air movement.
Watering, fertilizer and maintenance — precise doses & schedule
Follow a clear routine by season to avoid overwatering and salt buildup.
- Reservoir top-up: Check water level weekly. Top up so the water remains 2–3 cm below the pot bottom.
- Full water change & cleaning: Every 2 weeks (spring–summer) and every 3–4 weeks (autumn–winter) empty the jugs, scrub to remove algae, sanitize briefly, and refill with fresh water.
- Pot watering (top watering): Water the orchid from the top (thorough soak) rather than relying on reservoir wetting. Spring–summer: soak 1× every 7–10 days. Autumn–winter: soak 1× every 10–14 days. Let excess drain completely before returning pot to the reservoir.
- Fertilizer: Use a balanced orchid fertilizer at quarter strength (0.25× label rate). Apply with top watering every 7–14 days in the active growth season (spring–summer). Reduce to once every 4 weeks in autumn–winter. Do not add fertilizer to the reservoir water—salt concentration can build up as it evaporates.
- Water quality: Use rainwater, distilled water, or low-sodium filtered water. Avoid hard tap water with high salts or chlorine; if only tap water is available, let it stand 24 hours or use a simple filter.
Practical tips from experience
- Air movement: Keep gentle airflow (fan on low occasionally) so roots get oxygen—reservoir humidity is helpful but orchids still need moving air.
- Light: Provide bright, indirect light. The clear jugs can magnify heat in direct sun—avoid strong midday sun on the bottles to prevent overheating.
- Pot medium refresh: Replace bark every 12–24 months; bark decomposes and holds water as it ages, increasing rot risk.
- Algae control: If water becomes green, clean jugs immediately. Optionally cover jugs with a thin opaque sleeve to reduce light on the water surface while keeping the humidity benefit.
- Root checks: Inspect roots when repotting—healthy roots are firm and silvery-green when dry, turning bright green after watering.
Common botanical mistakes to avoid
- Never let potting mix sit submerged: Constant contact between bark and standing water leads to oxygen deprivation and root rot. Keep water 2–3 cm below the pot base.
- Don’t rely solely on the reservoir: The jug raises humidity but does not replace proper top watering and fertilizing—treat it as a supportive measure.
- Avoid compact, moisture-retentive media: Using soil or fine peat in this setup traps water and invites rot—only use coarse bark or specialized orchid mixes.
- Ignoring water quality: Hard, salty water causes leaf spotting and root damage over months—use rain/distilled/filtered water.
What to expect and timing
With consistent care and the reservoir microclimate in place, expect visible improvements in leaf turgor and new root activity in about 4–8 weeks. Stronger spikes and more floriferous blooms usually follow over the next flowering cycle (several months). This method reduces episodes of root rot when used correctly, but it is a supportive technique—not a cure for already-rotted roots. Always address drainage, light and watering basics first.
Conclusion — ready to try it?
This low-cost clear jug reservoir reproduces a humid yet well-drained microclimate that Phalaenopsis orchids appreciate. Follow the exact water-level rule (2–3 cm below pot base), weekly top-ups, fortnightly jug cleaning, and quarter-strength fertilizer schedule in the growing season. Combined with correct light, airflow and a coarse bark mix, you’ll likely see healthier roots and fuller blooms within weeks to months. Try one plant first, monitor carefully, and adjust to your home’s light and humidity—then scale up.
Action step: Gather one clean 3–5 L clear water jug, a 6–8 cm nursery pot and coarse orchid bark. Set the water level 2–3 cm below the pot bottom, follow the watering and fertilizer schedule above, and check results after 4–8 weeks.