Recovery Secret! Dying Orchid Suddenly Grows 100 Roots and Blooms All Year Round
Recovery Secret! Dying Orchid Suddenly Grows 100 Roots and Blooms All Year Round
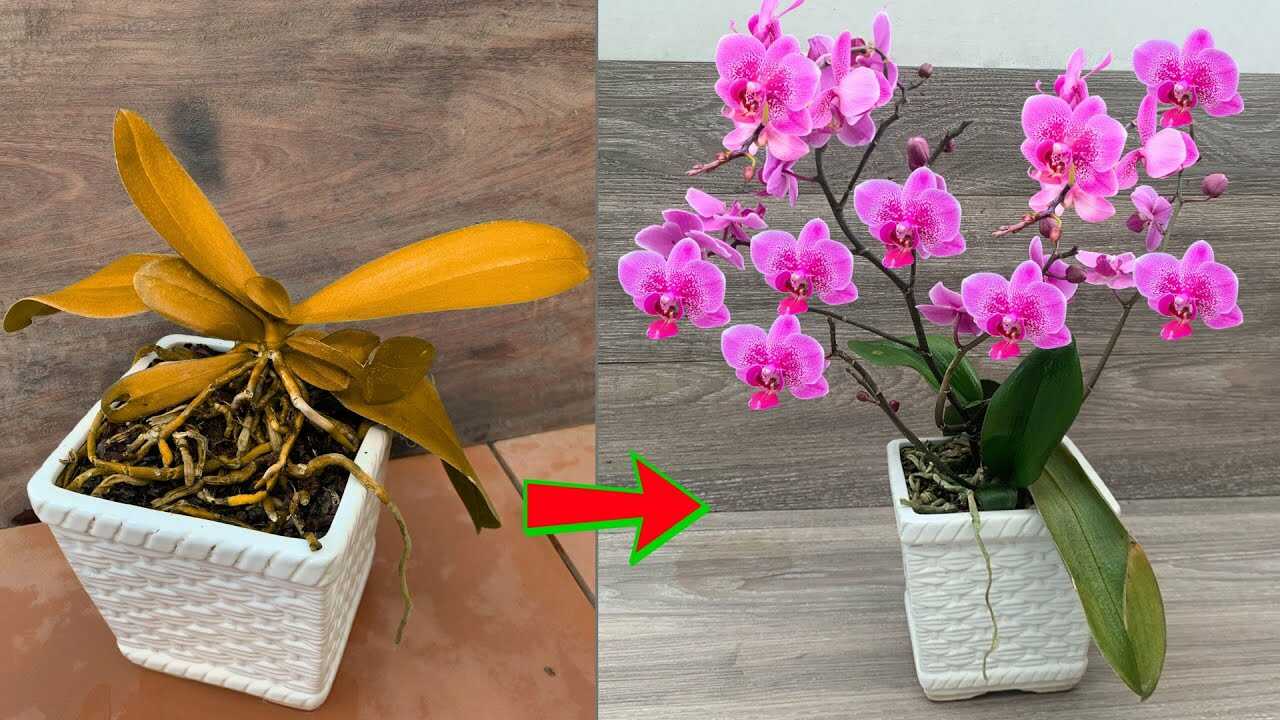
The photo shows a stressed Phalaenopsis in a white pot with many exposed aerial roots and a potting mix made of coarse **orchid bark** (large brown bark chips). This article focuses on that exact visible element — **fresh coarse orchid bark** — and how using it correctly can revive a declining orchid by improving aeration, drainage and root health. This technique is a complement to good light, watering and fertilizing — not a miracle cure.
Why coarse orchid bark helps (real, botanical reasons)
- Aeration and oxygen: Epiphytic orchids naturally grow on trees; coarse bark mimics that environment and keeps air around roots. Roots need oxygen to avoid fungal rot.
- Fast drainage: Large bark chips shed water quickly so roots are not waterlogged; this reduces conditions that favor root-rotting pathogens.
- Physical anchor: Bark gives firm support without compacting like regular potting soil, allowing new adventitious roots to develop along the crown and stems.
- Stable structure: Bark resists compaction for months, so the root zone remains porous as roots recover and regrow.
Step-by-step rescue using the bark you see in the image
Follow these steps precisely — prepare materials ahead: fresh coarse orchid bark (pine or fir, 1/4–1/2″ chips), clean pot with drainage, sharp sterile scissors or shears, 3% hydrogen peroxide, clean water, and powdered cinnamon (optional).
- Step 1 — Timing: Repot when the plant is not in active flowering; ideal season is early spring or when new root tips are starting (or minimum several weeks before expected growth). Do not repot a plant in full bloom if you can avoid it.
- Step 2 — Remove and inspect: Gently take the orchid from its pot. Examine roots: healthy roots are firm and whitish-green; dead roots are brown/black and mushy. Work over a towel to avoid losing parts.
- Step 3 — Trim dead tissue: Using sterile scissors, cut away all clearly dead or soft roots back to healthy tissue. Sterilize blades between cuts (wipe with rubbing alcohol).
- Step 4 — Quick disinfect (optional but commonly used): Briefly dip the trimmed root mass in a solution of 3% hydrogen peroxide diluted 1:3 with water (one part H2O2 to three parts water) for 1–5 minutes, then rinse with clean water. This is a commonly used practice among growers to reduce surface pathogens and add oxygen to the root zone; do not soak for long periods.
- Step 5 — Prepare the bark (critical): Pour the fresh coarse bark into a bowl and soak it in hot (not boiling) water for 30–60 minutes to rehydrate and remove fine dust. For extra sanitation, you may use the same 3% H2O2 diluted 1:10 as the soak water for 20 minutes, then rinse thoroughly with clear water. Drain the bark well — it should be moist but not soggy.
- Step 6 — Repot correctly: Place a thin layer of moist bark in the bottom of the pot. Position the orchid so the base (where leaves meet roots) sits just below the pot rim. Gently fill around roots with bark, working it between roots so they are supported but still airy. Do not bury the crown.
- Step 7 — Aftercare watering: Water once immediately after repotting to settle the bark, then follow the schedule below. Avoid heavy misting that keeps the crown wet for prolonged periods.
Exact doses, frequencies and seasonal schedule
- Bark type & amount: Use coarse fir or pine bark chips (1/4–1/2 inch). Fill pot so roots sit comfortably with about 1–2 cm of space below rim. Replace bark every 12–18 months or sooner if it breaks down.
- Disinfect dip: 3% hydrogen peroxide diluted 1:3 (H2O2:water) for 1–5 minutes maximum if used. Rinse after dipping.
- Watering: In active growth (spring–summer): water thoroughly once a week, allowing excess to drain. In cooler/less light months (autumn–winter): reduce to every 10–14 days. Adjust for indoor humidity and pot size — wait until bark is almost dry between waterings.
- Fertilizer: Use a balanced orchid fertilizer (e.g., 20-20-20 or label equivalent) at quarter strength: mix 1/4 teaspoon per liter (approx. 1/2 teaspoon per US quart) and apply every 7–10 days during growth. Flush the pot with clear water once a month to avoid salt buildup.
- Repot frequency: Repot into fresh coarse bark every 12–18 months for Phalaenopsis to prevent media breakdown and root suffocation.
Practical tips from experience
- Air roots are normal: Do not cut healthy aerial roots — they photosynthesize and take moisture. Tuck them gently into the bark or allow them to remain exposed; both are fine.
- Use the right pot: Clear plastic or shallow slotted ceramic pots help monitor root health and improve air circulation.
- Humidity and airflow: Provide 40–60% humidity and good air movement. A humidity tray or regular brief misting (not at the crown) helps when indoor air is dry.
- Pinch of cinnamon: Dusting fresh cuts with powdered cinnamon can reduce infection risk — it’s a mild fungicide commonly used by hobbyists.
Common botanical mistakes to avoid
- Using regular potting soil: Soil retains too much moisture and suffocates epiphytic roots — that causes rot, not revival.
- Overwatering after repotting: New bark is breathable — resist the urge to water daily. Let bark dry slightly between thorough waterings.
- Repotting at dormancy or bloom: Avoid repotting a plant in deep dormancy or mid-bloom unless it’s life-or-death; shock can delay recovery. Choose early growth phases.
- Leaving dead roots: Do not leave soft, black roots in place — they harbor pathogens and waste the plant’s recovery resources.
Realistic timeline and expectations
After repotting into fresh coarse bark and following the care schedule above, expect to see signs of recovery over several weeks to months. New healthy root tips often appear in 4–12 weeks; new leaves or a flower spike may take 3–9 months depending on the plant’s energy reserves and season. This method supports year-round blooming potential when combined with correct light, temperature and fertilization — it is not an instant fix.
Conclusion — take action now
If your photo looks like the left side of the image (brown leaves, compacted/old mix and dead roots), carefully repot into fresh coarse orchid bark using the exact preparation steps above. This change in substrate restores oxygen to the roots, reduces rot risk and creates the environment an epiphytic orchid needs to grow new roots and eventually rebloom. Start the process in the next suitable growth period, follow the watering and feeding schedule, and monitor for new root tips over the next several weeks to months.
Ready to try? Gather coarse orchid bark, a clean pot and sterile tools, and repot following the steps above. Share your progress after 8–12 weeks — small, steady improvements are the sign of a real recovery.