Secret to Easily Propagating Orchids Right on the Branch and Blooming All Year Round!
Secret to Easily Propagating Orchids Right on the Branch and Blooming All Year Round!
Introduction — what you see in the photo and why it matters
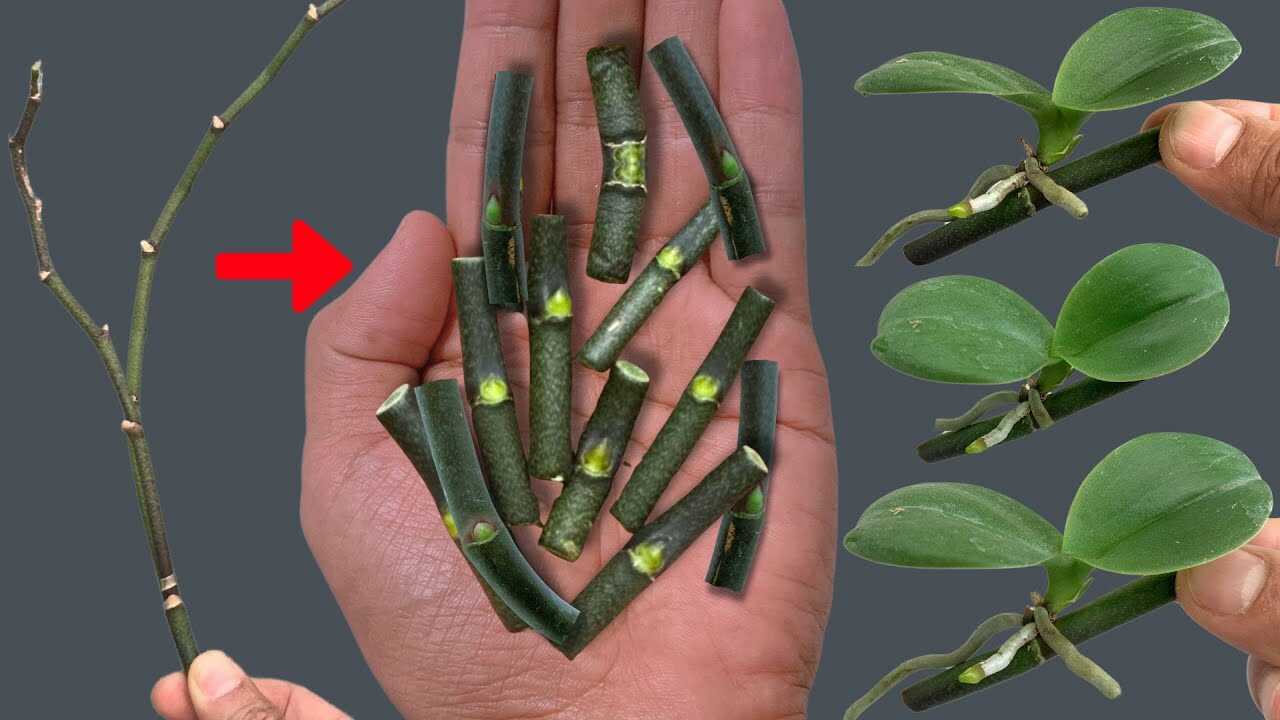
The image shows short green cylindrical segments of an orchid flower spike — each segment contains a small swollen point: a **node**. These are the exact pieces I’ll show you how to use to create new plants (keikis) directly from the branch. Using the spike nodes is a proven propagation trick because those nodes contain dormant **axillary meristems** that can develop into shoots and roots when stimulated and kept moist.
Why this works (botanical fact)
Orchid spikes (especially Phalaenopsis) carry dormant buds at their **nodes**. These buds are responsive to plant hormones: a cytokinin (such as benzyladenine used in commercial “keiki paste”) can stimulate shoot formation, while proper moisture and low, sterile microbial load let roots form. This is a supplement to regular care — light, water, and drainage remain essential.
Step-by-step: propagate using the spike nodes you see in the picture
- Gather tools: sharp scissors or pruning shears, 70% isopropyl alcohol (for sterilizing), long-fiber sphagnum moss, small clear plastic container or humidity dome, commercial keiki paste (benzyladenine) or plain method (no hormone).
- Sanitize and prepare: wipe tools with 70% isopropyl alcohol. Soak long-fiber sphagnum in clean water, then squeeze out excess so it is moist but not dripping.
- Cut the spike into segments: cut the flower spike into segments 2–3 cm (about 0.8–1.2 in) long so each segment contains one node (the tiny swollen bump). Make clean cuts and handle segments minimally.
- Optional — apply keiki paste: using a commercial keiki paste (benzyladenine), apply a single small dab about 2–3 mm in diameter directly on the node once. Do not reapply; overuse of cytokinin can cause malformed growth. If you prefer not to use hormones, the method will still work but usually takes longer and is less consistent.
- Position on sphagnum: lay each node segment on top of moist sphagnum (do not bury it). Ensure the node has good contact with the moss. Use a clear plastic container or humidity dome to maintain humidity.
- Environment: place in bright, indirect light (~1500–3000 lux), temperatures day 21–27°C (70–80°F), night 16–20°C (60–68°F). Keep humidity 70–90% using the dome.
- Moisture routine: mist the sphagnum and nodes gently twice daily to keep it evenly moist (not waterlogged). Aerate the dome once daily for 10–15 minutes to reduce fungal risk.
- Watch and wait — consistent timeline: expect to see tiny green shoots (keiki) appear in about 4–12 weeks; roots typically emerge within 6–20 weeks. These timeframes are several weeks to months — do not expect results in days.
- Potting the baby plant: when the keiki has 2–3 roots at least 2–3 cm (0.8–1.2 in) long, pot it into a small pot with coarse orchid bark or sphagnum and resume normal orchid watering. Start a diluted fertilizer regimen (1/4 strength balanced fertilizer) every 2 weeks during active growth.
Practical tips from experience
Use long-fiber sphagnum — it retains moisture while allowing air to reach the node. Glass or clear plastic containers let you monitor progress without disturbing the tiny keiki. If using keiki paste, one application per node is sufficient; more can cause abnormal growth.
Keep light steady — bright, indirect light encourages shoots without scorching. Bottom heat (about 2–4°C / 4–7°F warmer than ambient) can speed root development but is optional.
Fertilize carefully — once roots are established, use a balanced orchid fertilizer at 1/4 strength every 2 weeks during spring and summer; reduce frequency in winter to every 4–6 weeks.
Common mistakes to avoid (real botanical errors)
- Overwatering the moss: constant saturation causes bacterial and fungal rot; keep moss moist, not soggy.
- Burying the node: nodes need air contact and light — burying often prevents keiki formation.
- Repeated hormone application: excess cytokinin (keiki paste) can produce deformed shoots or inhibit roots.
- Using unsterile tools: this raises the risk of infection in the cut nodes — always sterilize with 70% isopropyl alcohol.
- Expecting immediate bloom: keikis need time to mature; aim for months of growth before expecting flowers.
Conclusion — a realistic path to more orchids and more blooms
Those small spike segments in the photo are a simple, low-cost way to multiply orchids. With clean cuts, moist long-fiber sphagnum, stable humidity/light, and — if desired — a single dab of commercial keiki paste, you can expect new shoots in several weeks and roots in several weeks to months. This technique supplements good orchid care (light, watering, drainage) and, when repeated and timed, helps you stagger plant maturation so you can enjoy flowers more often.
Ready to try it? Start by cutting one spike into 2–3 cm node segments, sterilize your tools, and set up a moist sphagnum tray. Document each node and check weekly — patience and steady conditions are the keys to success. Share your results and questions so other growers can learn from your experience!