Small Space? Old plastic basket? Grow Onions Like This Instead!
Small Space? Old plastic basket? Grow Onions Like This Instead!
Introduction
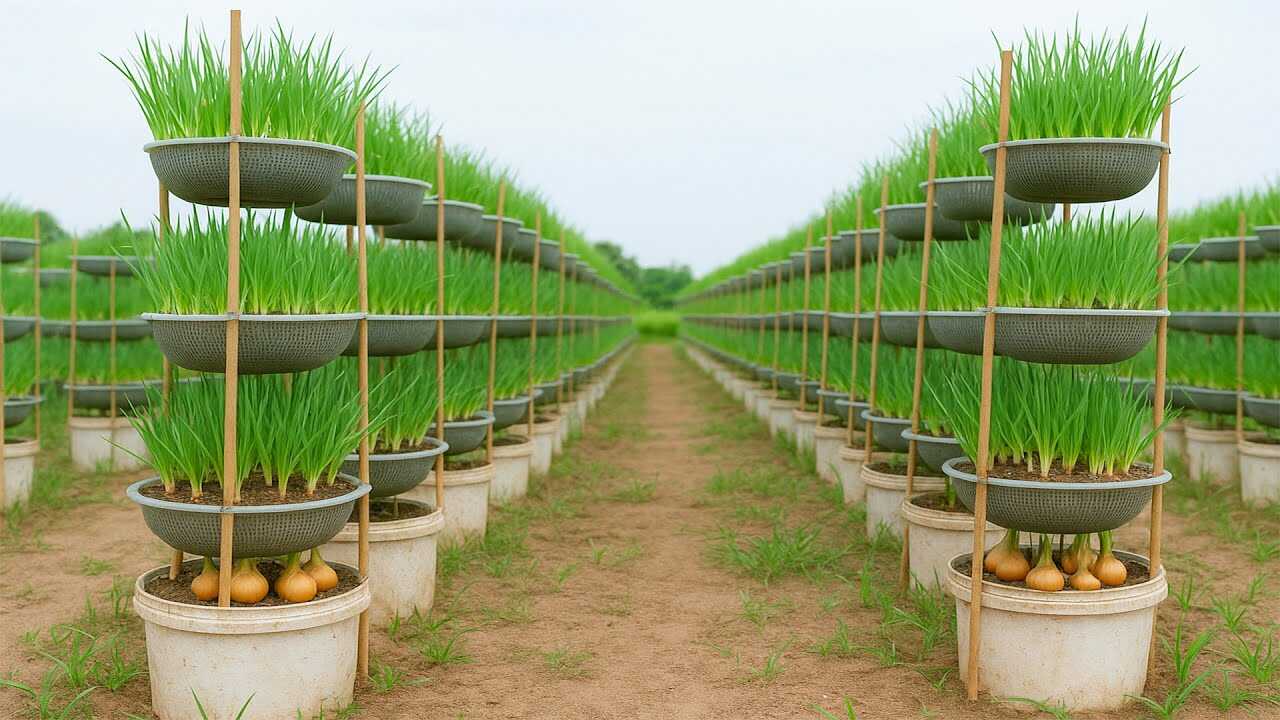
In the photo you can see stacked grey plastic colanders/strain ers perched above white buckets, creating a tall, airy tower of soil with bright green onion tops. This article shows exactly how to repurpose an old plastic basket or colander as a vertical onion planter so you can grow onions in the smallest of spaces while taking advantage of the colander’s natural drainage and aeration.
Why a plastic colander works for onions (the botanical reason)
Onions (Allium cepa) form bulbs best when their root zone is well drained and oxygenated. The perforations in a plastic colander allow excess water to escape and increase airflow around roots, which reduces the risk of waterlogged soil and common bulb rots. Use this method as a complement to good basics: light, watering, drainage, and appropriate fertilization—never as a replacement for those.
Materials and preparation (exact list and cleaning)
- One old plastic colander or basket per layer (clean and intact). If reusing, sanitize: soak in a 10% bleach solution for 10 minutes, rinse thoroughly, and air dry.
- A sturdy base bucket or pot per stack (to catch drainage).
- Two bamboo stakes (90–120 cm long) and durable ties; these will hold layers aligned and stable.
- Potting mix: 50% high-quality potting soil, 30% well-rotted compost, 20% perlite or coarse sand for drainage.
- Onion sets or transplants (choose a variety suited to your day-length zone).
Step-by-step: build and plant
- Assemble the stack: set your bucket on a level surface. Drive two bamboo stakes into the bucket so they are opposite each other and stable. Place the first colander on the bucket rim and thread the stakes up through or beside it so each layer sits between the stakes.
- Line the colander (optional): for very fine potting mixes, place a small square of coconut coir or landscape fabric in the colander to keep mix from falling through while preserving drainage.
- Fill depth: fill each colander with 3–4 inches (8–10 cm) of the soil mix. Each layer only needs this shallow depth because onions have relatively shallow root systems. For bulb-forming onions, stacked layers let you build vertical depth while keeping each layer well drained.
- Planting depth and spacing: push onion sets in so the tip is just covered—about 1 inch (2.5 cm) deep. Space sets 3–4 inches (7–10 cm) apart for medium bulbs or 2–3 inches (5–7 cm) for bunching/green onions.
- Stack more layers: add another colander layer, secure with ties, and repeat filling and planting. For most home stacks, 2–4 colanders per stake create a stable, productive tower.
- Stability and finishing: tie each layer to the stakes at the rim with reusable ties every 15–20 cm. Leave the top open for sunlight and watering.
Watering, feeding and seasonal schedule (precise doses and timing)
Water so the soil stays evenly moist but not soggy. For each colander layer, apply about 250 ml (1 cup) of water every 2–3 days during warm, dry weather. Reduce to once per week in cool or rainy conditions. Always check moisture by feeling the soil—if the top inch is dry, water.
Fertilizer: mix a balanced soluble fertilizer (example: 10-10-10) at the label rate. A practical home rate is 1 tablespoon (15 ml) per US gallon (3.8 L) of water. Apply as a light feed to the stack at planting, then repeat every 2–3 weeks during active top growth in spring. In fall planting, cut feeding frequency to every 3–4 weeks. Avoid heavy late-season nitrogen; excess N late in the season promotes leaf growth at the expense of bulb formation.
Expected timeline
Expect green shoots within 2–4 weeks. Bulb initiation commonly begins after 6–10 weeks, with mature bulbs ready to harvest in about 10–16 weeks depending on variety and day-length. This method is not instant—plan for several weeks to months of growth.
Practical tips from experience
- Choose onion sets for fastest results in shallow layers; transplants also work but handle roots gently.
- Use varieties suited to your latitude (short-, intermediate-, or long-day onions) for reliable bulbing.
- Rotate crops each season if you reuse the same buckets to reduce soil-borne disease risk.
- Place the stacks where they get at least 6 hours of sun per day for best bulb development.
Common mistakes to avoid
- Overwatering: colanders drain fast, but if bottom buckets keep soaked soil, bulbs can still rot—ensure runoff can escape and don’t let water pool around the base.
- Too deep or too shallow planting: sets should be covered ~1 inch; planting too deep delays sprouting, too shallow exposes bulbs to drying.
- Overcrowding: cramming bulbs closer than 2–3 inches for green onions or 3–4 inches for bulbs reduces bulb size and increases disease pressure.
- Excess late nitrogen: heavy feeding late in the season delays bulb maturation and makes storage poor.
Conclusion and call to action
Repurposing an old plastic colander or basket into a vertical onion planter is an efficient, low-cost way to grow onions in tight spaces while taking advantage of improved drainage and aeration. Follow the exact filling depths, planting spacing, watering volumes, and feeding schedule above, and expect results across several weeks to months. Try a single stacked column this season—then scale up if it fits your space. If you give it a go, share your progress and the variety you chose; gardeners love seeing how these towers perform in different climates!