Smart idea for Plastic Bottles, Recycling Plastic bottles into Flower pots
Smart idea for Plastic Bottles, Recycling Plastic bottles into Flower pots
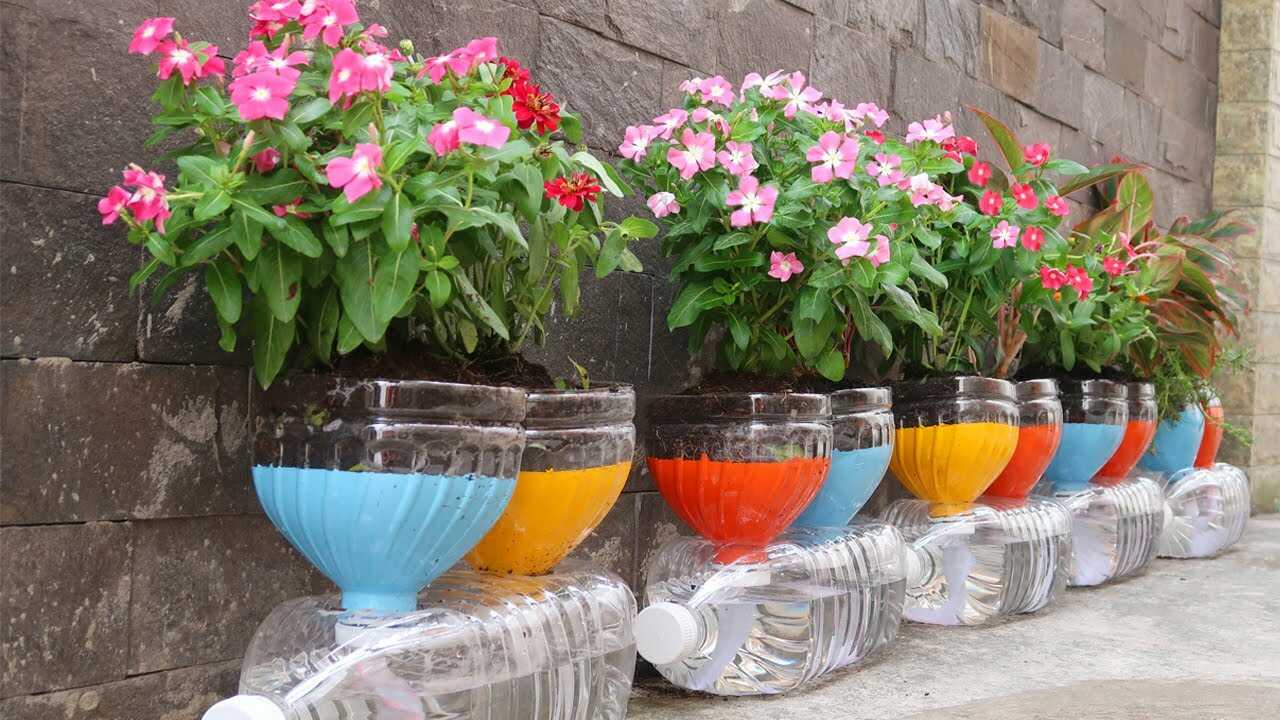
You see clear, cut plastic bottles reused as colorful, inverted mini-pots with soil and pink bedding flowers — a simple, effective DIY self-watering planter. This article shows exactly how to turn those bottles into reliable flower pots, why the design works for plant health, and how to make the system last through the season.
Why plastic bottles make great planters (botanical facts)
A plastic bottle used as a water reservoir and pot creates a steady supply of moisture by capillary action. Consistent moisture reduces water stress on roots, helping flowering annuals maintain steady growth and bloom production over several weeks. The reservoir also conserves water and cuts the frequency of top watering — a measurable horticultural benefit for container-grown plants.
Materials and exact measurements
- 1 clean plastic bottle (1.5–2 L) per plant; clear or tinted is fine.
- Sharp utility knife or scissors and a small drill or awl for holes.
- One strip of cotton fabric or a 6–8 mm cotton rope (20–30 cm long) per pot for the wick.
- Potting mix: 2 parts peat-free multipurpose compost, 1 part perlite (or coarse sand), 1 part well-rotted compost (ratio 2:1:1).
- Balanced slow-release fertilizer (e.g., 14-14-14): 1 teaspoon (≈5 ml) per liter of final potting volume.
- Optional: exterior acrylic paint to decorate, gravel for a thin base layer (2 cm).
Step-by-step construction (exact and practical)
- Cut the bottle in half horizontally. Keep the bottom segment as the water reservoir and the top segment inverted as the pot funnel.
- Drill or punch a single hole of 6–8 mm through the center of the bottle cap or make an equal-sized hole at the neck so the cotton wick can be threaded through. Thread the wick so one end reaches the reservoir and the other end sits 3–4 cm into the soil zone inside the inverted top.
- Place 2 cm of small gravel or broken pot shards into the bottom reservoir to keep the wick clear of fine sediment. Fit the inverted top into the reservoir neck so the wick end dangles into the water.
- Mix the potting blend (2:1:1). Add the slow-release fertilizer at 1 teaspoon per liter of potting volume and mix thoroughly into the top 5 cm of the soil you will add.
- Fill the inverted top with soil to about 2 cm below the rim. Plant the flower (e.g., vinca/annual periwinkle seen in the image) so the rootball is level with the soil surface; press lightly to remove air pockets.
- Fill the reservoir with water until the wick is submerged; replace the cap (if used) or close the bottle interface so the system sits secure. Decorate with paint if desired once dry.
Care schedule and precise doses
Refill the reservoir with plain water to capacity every 3–4 weeks during the main growing season (spring and autumn). In prolonged hot spells, check water level after 10–14 days and top up as needed, but expect most 1.5–2 L reservoirs to last several weeks for small bedding plants.
Fertilizer schedule: supplement the initial slow-release dose with a water-soluble balanced fertilizer at half the manufacturer’s recommended strength applied through the reservoir every 3 weeks during peak growth and flowering. Stop supplemental feeding 3–4 weeks before the end of the season or when plants go dormant.
Practical tips from experience
- Use a \u201ccotton wick\u201d rather than synthetic rope; cotton provides reliable capillary action and can be replaced easily.
- Choose a light, free-draining mix (avoid native garden soil) to prevent compaction and root anaerobia.
- Place brightly colored flowering annuals in sites with the appropriate light: most bedding plants in the photo need full sun to partial shade. Check species light requirements before siting.
- Label each bottle with the plant name and date planted so you can track when to refill or re-pot.
Common mistakes to avoid (botanical reasons)
- Filling with garden soil: it compacts, reduces aeration and promotes root rot. Use the specified potting mix instead.
- Blocking the wick or using a wick that is too thin: reduces water flow and leads to drying out; use a 6–8 mm cotton rope.
- Overfilling the reservoir so the wick is fully submerged under silt: maintain the gravel layer to keep the wick clear.
- Expecting instant results: root adjustment, steady moisture benefits and improved blooming appear over several weeks, not days.
Seasonal adjustments
In winter or dormant periods, reduce watering frequency: check reservoirs and top up only if soil feels dry; stop supplemental feeding. In very hot summer, increase checks to avoid irrigation stress, but keep the main refill schedule at approximately every 3 weeks as a baseline for 1.5–2 L reservoirs.
Conclusion and call to action
Recycling those clear plastic bottles into colorful, self-watering flower pots gives you a low-cost, water-wise solution that supports steady plant growth and repeated blooms over several weeks. Try one planter this weekend: follow the exact mix and wick instructions, use the fertilizer doses and refill schedule above, and you\u2019ll have a tidy, low-maintenance display in weeks.
Share a photo of your finished bottle planters or ask for troubleshooting tips — I\u2019m here to help you get vibrant results from recycled materials.