Tips for propagating guava trees by cuttings with Aloe vera for Beginner
Tips for propagating guava trees by cuttings with Aloe vera for Beginner
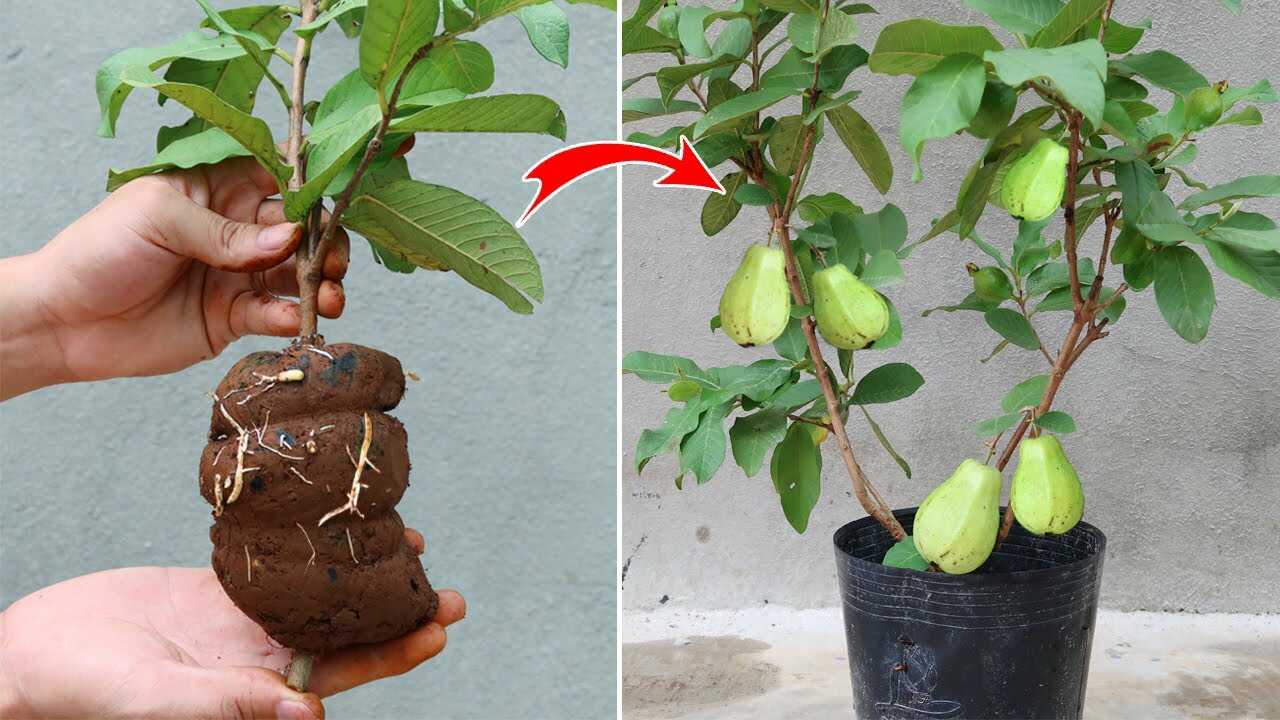
The photo clearly shows a guava cutting wrapped in a compact brown mud/soil ball with fresh white roots emerging. In this guide I’ll show you how to use that same mud-ball technique — combined with fresh Aloe vera gel as a natural rooting aid — to increase your success rate. This is a practical, low-cost method that relies on moisture retention from the mud and the mild rooting and antimicrobial properties of Aloe vera. Remember: this is a complement to proper light, watering and drainage, not a miracle cure.
Why the mud ball works and what Aloe vera adds
- Mud/soil ball: a moist, close-contact medium retains water around the stem, encourages root initiation by keeping cells hydrated and in contact with oxygen-limited but humid conditions suitable for root primordia.
- Aloe vera: fresh gel contains naturally occurring plant hormones (small amounts of auxin-like and growth-promoting compounds) and polysaccharides with mild antimicrobial action — factors gardeners use as a gentle natural rooting aid.
- Together they provide continuous moisture contact plus a mild biological stimulus and protection against some surface pathogens. Still, correct cutting selection, light and watering remain essential.
Materials and precise doses (for one guava cutting)
- 1 semi-hardwood guava cutting, 20–30 cm long, with 4–6 leaves reduced to 2–3 at the top
- Approximately 1 cup (240 ml) garden loam or topsoil
- 1/2 cup (120 ml) coarse sand or perlite (to improve aeration)
- 2 tablespoons (30 g) well-rotted compost
- Water to reach a firm, moldable consistency (aim for the texture of modeling clay; not runny)
- 1 tablespoon (15 ml) fresh Aloe vera gel (from a leaf) per cutting for coating the basal 2–3 cm
- Clear plastic sheet or small plastic bag and twine to protect the mud ball (optional but recommended)
Step-by-step method
- Select a healthy semi-hardwood stem in spring or early summer. Cut a 20–30 cm length with a clean, sharp pruning tool. Remove the lower leaves, leaving 2–3 near the tip.
- Make a light slanting cut at the base and optionally nick the bark (a small vertical scrape about 1–2 mm) over 1–2 cm to expose cambium — this helps rooting for many woody cuttings.
- Dip the fresh basal 2–3 cm into about 1 tablespoon (15 ml) of fresh Aloe vera gel, coating the wound and base. Leave the gel on; do not rinse. The gel application should be once at preparation; you can reapply only if repositioning after several weeks.
- Mix 1 cup loam + 1/2 cup coarse sand + 2 tablespoons compost. Add water gradually until you can form a firm, tacky ball that does not drip. This mimics the mud/soil ball seen in the photo.
- Mold the moist mixture around the basal 8–12 cm of the cutting to form a compact cylinder about 3–5 cm thick. Ensure good contact between medium and stem. If you want to replicate air-layering you can wrap with clear plastic to retain moisture, but for cuttings the mud ball itself is sufficient if kept shaded and humid.
- Stand the cutting upright in a free-draining pot or place the mud-wrapped cutting into a nursery bag/pot so the mud ball is not crushed. Keep the medium just damp, not waterlogged.
- Place in bright, indirect light (filter morning sun). Maintain ambient temperatures 20–28°C (68–82°F) if possible.
Watering, timing and exact schedule
- Check moisture every 3–4 days in warm months and every 5–7 days in cooler months. The mud ball should remain evenly damp — not soggy. Lightly mist the mud ball surface when the top begins to dry.
- Do not drench or leave the pot standing in water; poor drainage causes rot. If wrapped in plastic, ventilate briefly once a week to reduce fungal risk.
- Expect root initiation in 6–12 weeks. Check gently after 6 weeks by feeling for resistance or small root tips at the edge of the mud ball; if nothing appears, keep the cutting for up to 12 weeks before deciding to re-cut or reapply treatment.
- Transplant to potting mix only after a healthy root system has formed (usually 8–12 weeks). Harden off gradually for a week in brighter light before moving to full sun.
Practical tips from experience
- Use fresh Aloe vera gel from a cut leaf. Store-bought gels can contain additives that reduce effectiveness.
- Work with slightly aged loam that is free of large stones and pest eggs. The added sand/perlite prevents the mud ball from turning into a dense brick that suffocates roots.
- Wounding the base lightly speeds rooting on woody plants like guava but keep wounds small to avoid disease entry.
- If you must reapply Aloe vera, only do it if the cutting shows no signs of rooting after 6–8 weeks; remove the mud gently, re-coat the base for 10–15 minutes in fresh gel, then remake the mud ball.
- Label cuttings with date and variety. Guava varieties root at different rates.
Common mistakes to avoid
- Avoid using pure dense clay or heavy garden soil without sand/perlite — it holds too much water and can cause rot.
- Do not overwater; constant standing water will kill a cutting even with Aloe vera applied.
- Avoid taking very old, fully woody or very immature green cuttings — semi-hardwood is best.
- Do not skip sterilizing cutting tools; pathogens introduced at the cutting point cause failure more than lack of hormones.
- Don’t expect roots in days; allow at least 6–12 weeks before judging success.
Conclusion and call to action
That brown mud ball you saw in the photo is a simple, effective way to keep a guava cutting moist while roots form. Pairing that mud/soil ball with a one-time coat of fresh Aloe vera gel gives you a low-cost, natural boost and mild antimicrobial benefit. Follow the precise mixing ratios, moisture schedule and the 6–12 week timeline above, and you’ll greatly improve your chances of successful cuttings. Try one or two cuttings this season, note dates and results, and refine your technique — then share your successes so other beginners can learn from your experience!