Why do potatoes grow in bags of soil have so many tubers? Here is the answer
Why do potatoes grow in bags of soil have so many tubers? Here is the answer
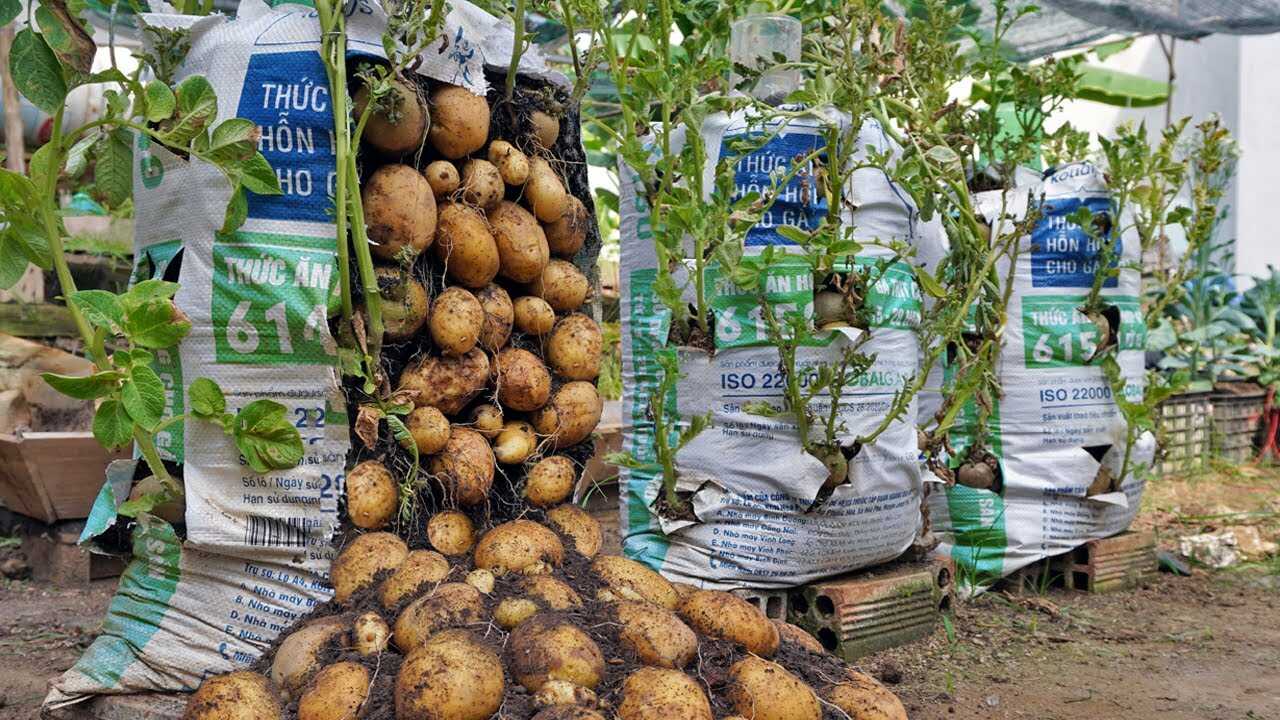
Looking at the photo of those white woven feed sacks filled with loose soil and a cascade of fresh **potato tubers**, you can see the result of a simple container technique that often produces an unusually high number of tubers. The image shows potatoes grown in vertical bags with side slits and the tubers packed along the length of the soil column. Below I explain exactly why that happens and give a practical, step‑by‑step method you can replicate.
Quick botanical explanation: why bags produce many tubers
Several real, verifiable horticultural factors combine in bag-grown potatoes to encourage numerous tubers:
- Layered earthing up (hilling) — adding soil around the stem as it grows exposes more stem nodes that can form stolons, the short underground shoots that generate tubers. Bags make layering easy and concentrated.
- Loose, well‑aerated medium — a friable mix in a bag encourages stolon growth and lateral tuber formation because stolons need loose soil to expand and swell into tubers.
- Concentrated root zone — a confined vertical soil column keeps roots and stolons in a compact zone with consistent moisture and nutrients, increasing the number of tuber initiation sites per plant.
- Seed tuber and stem number — cutting seed tubers into pieces or using tubers with multiple eyes produces more stems, and each stem can set stolons and tubers along the bag’s depth.
- Balanced phosphorus and potassium — adequate P and K at tuber initiation support tuber set and development; conversely, excess nitrogen delays tuber formation and favors foliage growth.
Step‑by‑step: how to reproduce the “many tubers” bag method (precise doses and schedule)
Designed for a typical 20–30 L woven bag (like the ones in the photo). Adjust volumes proportionally for smaller/larger containers.
- Soil mix (fill one 20–30 L bag)
- 60% good loam or topsoil (12–18 L)
- 30% mature compost (6–9 L)
- 10% coarse sand or horticultural perlite (2–3 L) for drainage
- Planting
- Use one seed tuber or one seed piece per bag (50–100 g whole seed potato or a cut piece with 1–2 eyes). Plant the seed at 10–12 cm depth from the top of the initial fill.
- At planting, add 1 tablespoon (≈15 g) of bone meal or rock phosphate (source of phosphorus) and 1 tablespoon (≈15 g) of a low‑nitrogen granular fertilizer (example N‑P‑K 5‑10‑10) mixed into the soil.
- Earthing up schedule (the key to many tubers)
- When shoots reach 15–20 cm tall (about 3–4 weeks after emergence), add 10–15 cm more of the same soil mix around the stems so only the top leaves show.
- Repeat this earthing up every 2–3 weeks until the bag is nearly full or until the plant flowers. Each new layer increases the number of nodes that can produce stolons and tubers.
- Watering
- Keep the bag evenly moist. In warm weather, water ~1–2 liters per bag every 2–3 days; in cooler/wetter conditions reduce frequency. Do not allow the medium to dry out completely during tuber initiation.
- Fertilizer follow‑up
- Side‑dress with 1 teaspoon (≈5 g) of the same low‑N granular fertilizer per bag every 3 weeks until flowering begins. Stop adding nitrogen once flowering is obvious to avoid delaying tuber bulking.
- Timing and harvest
- Tuber initiation typically begins several weeks after emergence (roughly 3–6 weeks). Expect to harvest baby/new potatoes at 10–12 weeks and main crop potatoes at 14–18 weeks, depending on variety.
- Practical bag details
- Make ventilation/harvest slits as in the photo: cut 6–8 cm side openings at staggered heights to inspect or harvest without emptying the bag.
- Ensure the bag sits on a few bricks or coarse gravel for drainage—standing water will reduce tuber set.
Practical tips from experience
- Use smaller seed tubers or single‑eye pieces if you want many small tubers (new potatoes). Whole large seed tubers tend to produce fewer, larger tubers.
- Choose the right variety: some cultivars are bred to produce many small tubers (salad/new varieties), while others make fewer large tubers (baking types). Match variety to your goal.
- Keep nitrogen moderate early on for foliage, then reduce it at tuber initiation. Excess N tends to reduce tuber number and delay bulking.
- Maintain consistent moisture: wet‑dry cycles during tuber set can cause hollow or misshapen tubers and reduce uniformity.
- Prevent greening: do not expose developing tubers to light—the bag technique prevents greening by keeping tubers buried as you earth up.
Common mistakes to avoid (real botanical issues)
- Overfertilizing with high nitrogen — produces lush foliage but fewer tubers and can encourage disease.
- Poor drainage or compacted mix — stolons cannot expand in heavy, soggy soil; this reduces tuber formation and increases rot.
- Not earthing up — if you leave the plant un‑earthed in a short soil column, you limit the number of nodes that can produce stolons, so yields (tuber counts) stay low.
- Planting too deep without oxygen — excessively deep, dense planting without aeration slows emergence and can delay tuber initiation.
- Crowding with multiple seed tubers per small bag — too many seed pieces in a small volume compete and produce many tiny, low‑quality tubers.
Conclusion — try it and measure
The photo shows exactly why bag culture often yields a wall of potatoes: repeated earthing up, a loose, well‑drained medium, a compact root zone, and appropriate nutrient management encourage many stolons to form tubers along the soil column. This is not a miracle—it’s basic plant physiology applied in a controlled container. If you try it, follow the soil mix, planting depths, earthing up schedule and fertilizer doses above, and expect to see tuber initiation within several weeks and harvestable potatoes in 10–18 weeks depending on variety.
Want a checklist or a printable planting schedule tailored to your bag size and climate? Leave your bag volume and local season and I’ll give you precise tweaks.