DIY Vertical Garden from Plastic Bottles – Grow Lettuce, Green onions at Home Easily
DIY Vertical Garden from Plastic Bottles – Grow Lettuce, Green onions at Home Easily
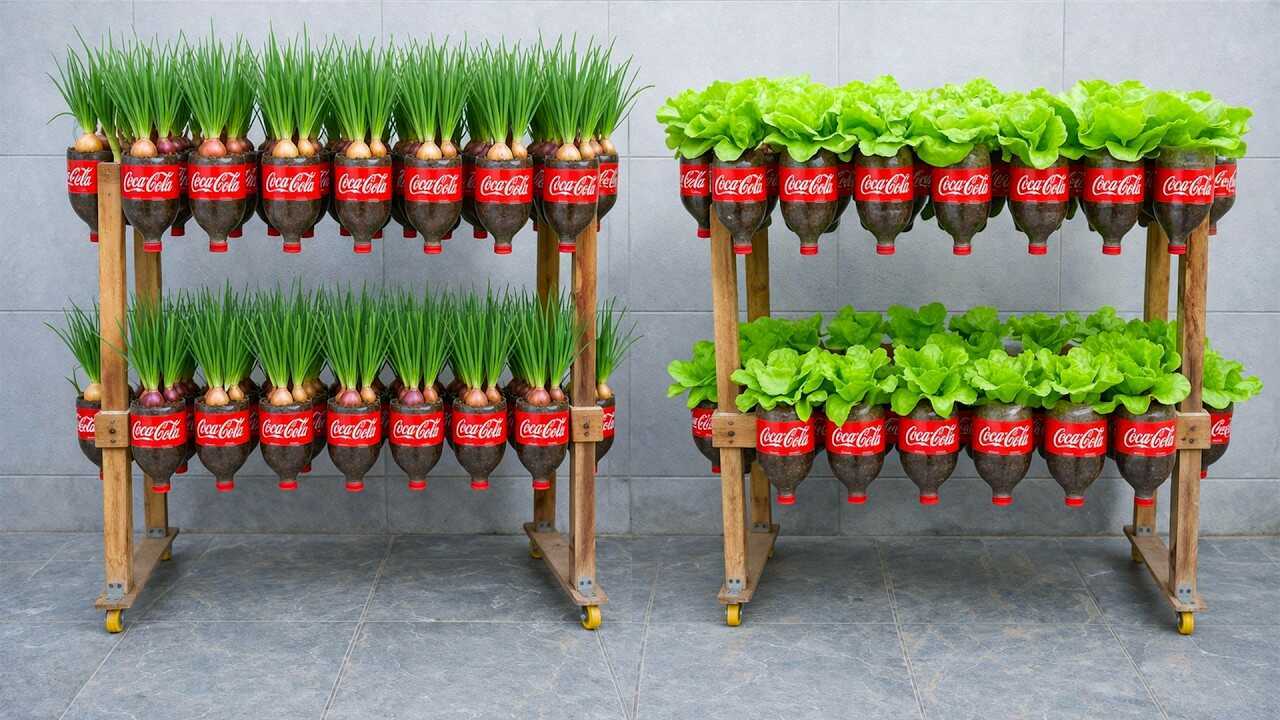
The photo shows a tidy, space-saving rack made from recycled plastic bottles (clear PET soda bottles) used as individual planters for rows of bright green lettuce and clumps of green onions. This guide walks you through turning 1.5–2 L bottles into a durable, lightweight DIY vertical garden, explains why PET bottles are a practical choice, and gives precise mixes, doses and schedules so you get steady growth over several weeks.
Why use plastic bottles for vertical gardening?
Polyethylene terephthalate (PET) bottles in common use for soft drinks are lightweight, waterproof and mechanically stable at normal outdoor temperatures. For horticulture these qualities mean you can easily control drainage, soil volume and placement, and the bottles last season after season without crumbling. PET is inert in typical garden conditions, so bottles make reliable temporary containers for leafy greens when prepared and cleaned properly. Always combine this technique with proper light, watering and drainage — the bottles are a tool, not a cure-all.
Materials and precise measurements
- Bottles: 1.5–2 L PET soda bottles (cleaned and labels optional)
- Frame: simple wooden rack or wall-mount supports spaced ~15 cm vertically and horizontally between rows
- Soil mix (by volume): 50% high-quality potting mix, 30% coir (coconut fiber) or peat, 20% perlite or coarse sand
- Compost: Add 10% well-rotted compost to mix for nutrients
- Drainage holes: 3 holes of 4–6 mm near the bottle’s lowest point
- Planting depth: 10–15 cm of substrate for lettuce, 6–8 cm for green onions
- Fertilizer: balanced liquid fertilizer (e.g., 10-10-10) at 1/4 strength every 2 weeks during active growth
Step-by-step: build and plant your bottle vertical garden
- Clean and prepare bottles: Rinse bottles thoroughly. If you used bottles that once held sugary drinks, wash with warm water and a mild detergent, then rinse. Optional: soak in a 10% bleach solution for 10 minutes and rinse well to remove microbes and residues.
- Cut and shape: Cut the bottle so the main body becomes the planter. Two common approaches: (a) cut across the top third and invert the neck into the body as a funnel for watering, or (b) cut a rectangular opening on the side for a planted pocket. For racks like the photo, cut horizontally so the bottle hangs with the neck pointing down; leave enough rim to secure to the frame.
- Drainage: Drill or poke 3 holes (4–6 mm) near the lowest point so excess water drains freely. Test drainage with a cup of water before planting.
- Mounting: Thread bottles on a horizontal rod, mount them on slots on a wooden frame, or use zip ties/rope through two drilled holes near the rim. Keep spacing ~15 cm vertically between rows so leaves have room.
- Fill with substrate: Add your soil-coir-perlite-compost mix. Compress lightly; leave ~1.5–2 cm from the rim. For lettuce, fill 10–15 cm depth; for green onions, 6–8 cm is sufficient.
- Planting: For lettuce, transplant 1 seedling per 1.5–2 L bottle for full heads. For loose-leaf varieties, sow seeds thinly and harvest baby leaves after several weeks. For green onions, plant sets or seedlings in groups of 3–5 per bottle if you plan to harvest green tops continuously.
Watering, feeding and timing (precise recommendations)
Watering: In warm weather (late spring to summer) water each bottle 2–3 times per week so the substrate stays evenly moist but not waterlogged. In cooler shoulder seasons (spring/fall), water 1–2 times per week. If bottles are hung and drain freely, check moisture by feeling the substrate — watering frequency may vary by sun exposure.
Fertilizer: Apply a balanced liquid fertilizer (10-10-10 or similar) diluted to 1/4 manufacturer strength every 2 weeks during the active growth period (spring and summer). Reduce to once monthly in cooler weather. Lettuce benefits from steady nitrogen during head development; green onions appreciate moderate nitrogen for leafy growth.
Harvest timeline: Expect baby lettuce leaves in 4–6 weeks and mature heads in 6–8 weeks under good light. Green onions can be harvested as scallions in 6–8 weeks; regrowth is possible within several weeks after cutting if plants remain healthy.
Practical tips from experience
- Protect bottles from UV: PET becomes brittle over many months of direct sun. Paint the exterior (non-toxic paint) or position bottles with some afternoon shade to extend life.
- Temperature control: Dark bottles will warm more; in hot climates place the rack in morning sun and afternoon shade to prevent root heat stress for lettuce.
- Rotation: Rotate rows on the rack every 1–2 weeks so all plants get even light and avoid leaning growth.
- Mulch top: A thin layer of compost or straw helps retain moisture and reduces algae growth inside transparent bottles.
- Sterilize between crops: Clean bottles between plantings to prevent disease carryover — a short bleach soak and full rinse works well.
Common botanical mistakes to avoid
- Using garden soil: Do not use heavy garden soil in bottles — it compacts and blocks drainage. Use a light potting mix blended as described above.
- Too little substrate: Lettuce grown in tiny volumes will bolt or stop producing; provide at least 10–15 cm of planting depth for heads.
- Poor drainage: Failing to provide holes causes root rot. Always test drainage before planting.
- Overfertilizing: Full-strength feed can burn shallow-rooted lettuce and onions. Stick to 1/4 strength liquid fertilizer on the schedule above.
- Ignoring light needs: Lettuce and green onions need 10–14 hours of bright light for best growth. A sheltered patio or sun-facing wall is ideal.
Conclusion — get growing with recycled bottles
This DIY vertical garden using recycled PET bottles is an economical, modular way to grow fresh lettuce and green onions at home. Follow the exact substrate mix, planting depths and watering/fertilizer schedule above, and you’ll see steady growth over several weeks. Start with a small rack, tweak light and water to your conditions, and expand once you’ve harvested your first heads. Ready to try it? Gather 10–20 bottles, a simple frame and the soil mix, plant this weekend, and share your photos once you’ve got green shoots!