Growing orchids this way, Orchids take Root immediately and Bloom all year round
Growing orchids this way, Orchids take Root immediately and Bloom all year round
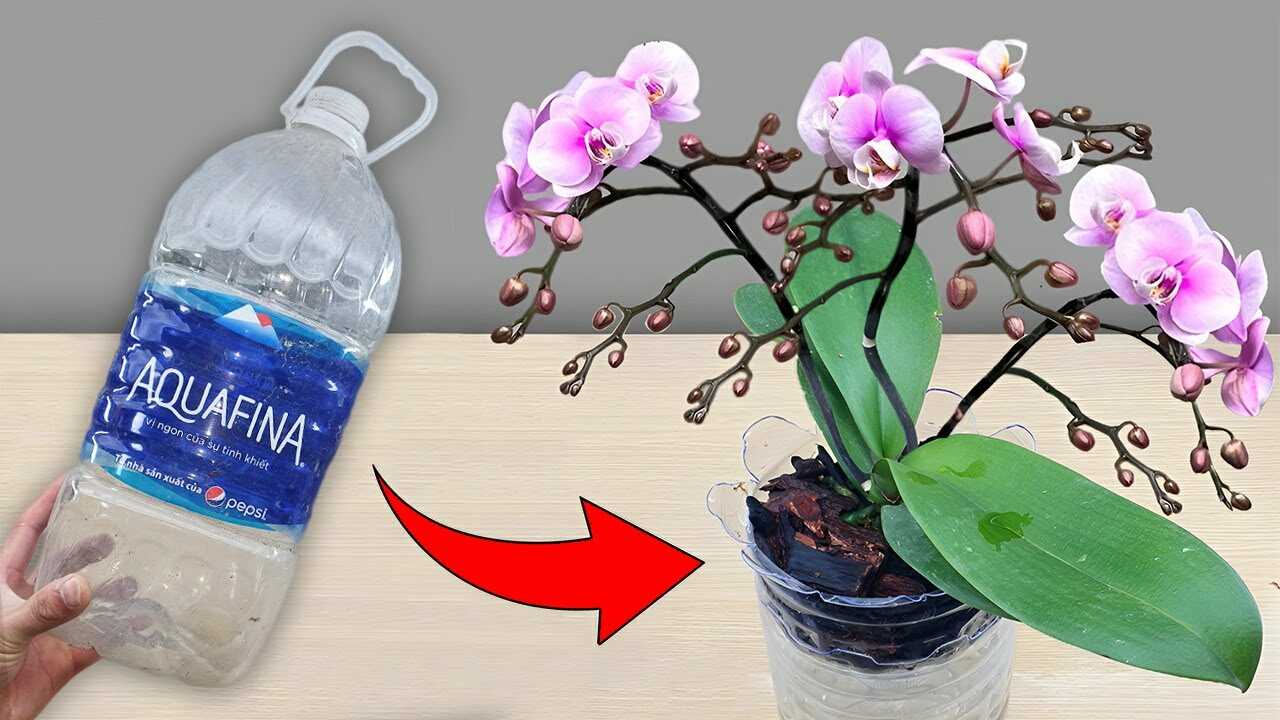
The photo shows a large clear plastic water jug (an Aquafina-style bottle) repurposed as an orchid pot. This article explains, step by step, how to use that clear plastic bottle as a practical, low-cost pot for a Phalaenopsis-style orchid. The central idea: a clean, clear plastic bottle gives you a transparent pot for monitoring roots and moisture, while preserving humidity and aeration when filled with chunky bark.
Why a clear water bottle works for orchids (botanical facts)
Most commonly sold orchids (Phalaenopsis) are epiphytes with aerial roots covered in a spongy layer called velamen. That velamen quickly soaks up water and also needs oxygen. Using a clear plastic bottle as a pot lets you: 1) visually monitor root color and moisture, 2) maintain a small humid micro-reservoir around the bark without keeping the medium constantly waterlogged, and 3) allow rapid drying of the bark surfaces between waterings. These are real horticultural advantages—not magic—and they support root health and flowering when combined with proper light, drainage, and fertilization.
Materials and preparation (exact and visual)
You will need: one large clear plastic water jug (the one in the image is roughly a 3–5 L jug), a clean cutting tool, a drill or heated nail for holes, coarse orchid bark (fir bark, 1–2 cm chunks), optional horticultural charcoal (small pieces), and a balanced water‑soluble orchid fertilizer. Clean the bottle with mild soap and rinse thoroughly before use.
How to cut and prepare the bottle (precise)
- Cut the bottle about 10–12 cm (4–5 inches) up from the base to create a pot with a stable rim. Keep the bottom section (about 10–12 cm tall) as your pot—this height fits typical 1–2 bloom‑spike Phalaenopsis plants.
- Make drainage holes in the base: drill or melt 6 holes, 5–6 mm diameter each, spaced evenly. Add 6–8 small lateral air holes (3–4 mm) about 3–5 cm up the side to improve aeration.
- If you want a two-piece reservoir system, save the top section inverted as a false bottom; otherwise use the single-piece pot as shown in the image.
Potting step-by-step (with exact proportions)
- Mix medium: 80% coarse fir bark (1–2 cm chunks), 10% horticultural charcoal, 10% coarse perlite. For a 10–12 cm tall bottle pot use ~2–3 cups (500–700 ml) total mix.
- Place a thin layer (1–1.5 cm) of bark at the bottom to protect roots from sitting on the drainage holes.
- Center the orchid so the crown (where leaves meet roots) remains above the bark surface by 0.5–1 cm—do not bury the crown.
- Fill around the roots gently with the bark mix until the roots are supported but still visible through the clear plastic.
- Water once thoroughly after potting so excess drains out the holes; then allow the bark to dry partially before the next watering.
Watering, fertilizer and schedule (precise doses & seasons)
Orchids in a chunky bark mix need to dry between waterings. Expect a steady routine rather than instant results—improvements in root vigor are typically visible within 4–8 weeks with consistent care.
- Watering frequency: spring–summer: water thoroughly every 7–10 days; autumn–winter: every 14–21 days. Adjust if your indoor humidity or temperature is very different (more frequent in hot/dry rooms, less frequent in cool/humid rooms).
- Watering method: soak the bark until water flows from the drainage holes, then let the pot drain completely. Do not let the plant sit in standing water.
- Fertilizer: use a balanced, water‑soluble orchid fertilizer at 1/4 strength (25% of the label recommendation). Feed every 2 weeks during active growth (spring–summer) and every 4 weeks in autumn–winter. Once per month flush the pot thoroughly with plain water to remove salt buildup.
- Humidity: the clear bottle will help retain micro‑humidity; if your air is very dry, mist around (not into the crown) or place the pot on a humidity tray. Keep crown dry to prevent rot.
Practical tips from experience
- Monitor roots through the clear wall: healthy roots are firm and green/gray with wet velamen, and silvery‑gray when dry. Yellowing, soft brown roots signal overwatering or root rot—repot and trim infected tissue.
- If algae or moss develops on the bottle interior due to light exposure, wrap the lower half with opaque tape, leaving a 2–3 cm “window” to inspect roots.
- Repot every 12–18 months (or sooner when bark breaks down). Fresh bark restores aeration and prevents compaction that causes root suffocation.
- Keep the bottle pot out of direct midday sun—clear plastic can overheat roots. Bright, indirect light is ideal for Phalaenopsis.
Common mistakes to avoid (real botanical errors)
- Do not bury the crown when filling the bark—this causes crown rot. Crown rot is a common, preventable fungal/bacterial problem.
- Avoid keeping the medium constantly wet. Epiphytic orchids need oxygen at the root surface; prolonged saturation invites root‑rot pathogens (Pythium, Phytophthora).
- Don’t overfertilize. Salt burn from full‑strength fertilizer damages delicate roots; always dilute as recommended above.
- Don’t use garden soil or fine potting mix. These hold too much water and lack the large air spaces orchids require.
Expected timeline and realistic results
Using a clear bottle pot with coarse bark gives you better root monitoring and more consistent humidity. You should notice clearer root color and fewer water‑stress signs within 4–8 weeks. With proper light, correct watering, and the fertilizer schedule above, many growers see improved flowering cycles over several months—but this method is a supportive practice, not a miracle: blooms depend on light, temperature cues, and plant maturity.
Conclusion — try it and observe
Repurposing the clear Aquafina‑style bottle in the photo into a ventilated orchid pot is inexpensive, effective, and lets you visually care for your plant. Follow the exact cutting, hole, and bark guidelines, stick to the watering and fertilizer schedule, avoid the listed mistakes, and expect visible improvement in root health within a few weeks. If you try this, watch the roots through the clear wall and adjust water frequency to your home climate—your orchids will reward steady, informed care with stronger roots and more reliable blooms.