Unbelievably abundant fruit – New method to grow cucumbers at home
Unbelievably abundant fruit – New method to grow cucumbers at home
Introduction: foam rafts and strings of cucumbers
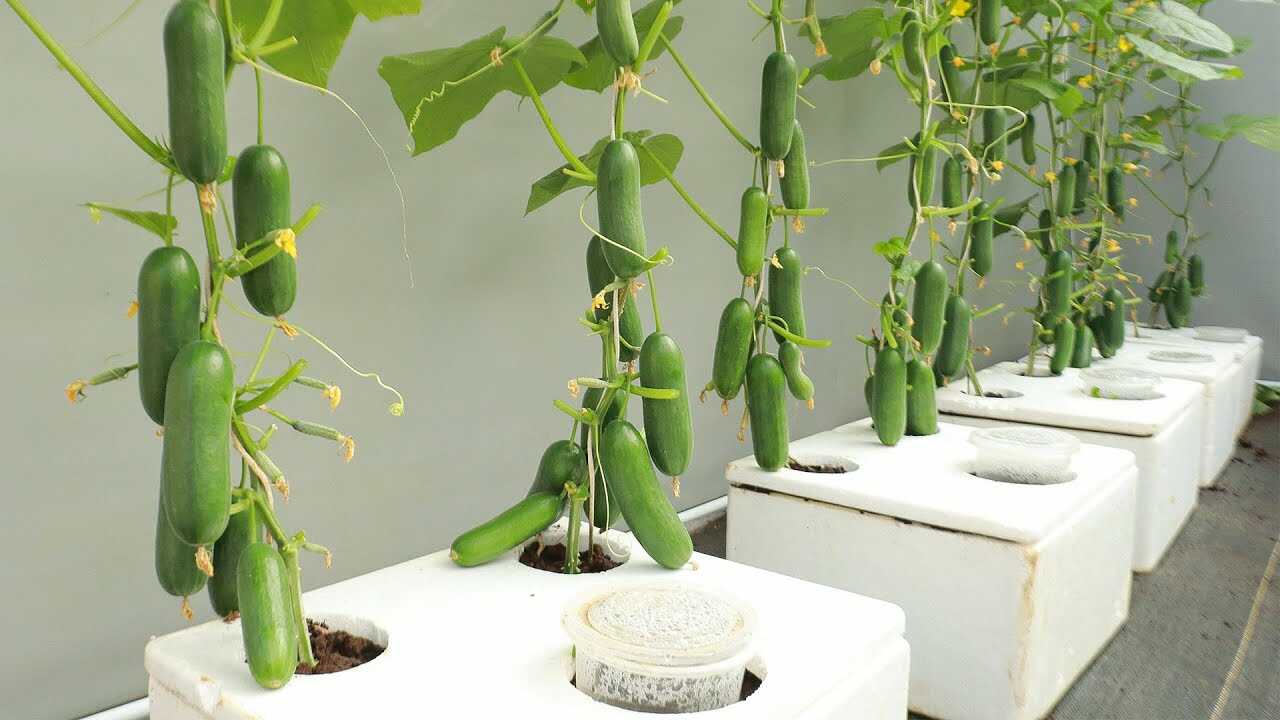
The photo shows a neat row of cucumbers suspended from a vertical trellis, each plant rooted in a white **polystyrene foam** block sitting over a nutrient reservoir. That white, rigid foam surface (foam raft or foam lid) is the visual anchor of this method — it physically supports the plant, keeps the roots in the nutrient solution and blocks light to the reservoir to reduce algae. This article explains, step by step, how to replicate that system at home and get **unbelievably abundant cucumbers** using a simple foam-based hydroponic setup.
Why use a white polystyrene foam raft?
Polystyrene foam is an **inert**, lightweight and insulating material well suited to small hydroponic rafts or reservoir lids. In practice it:
- Supports plants securely in net pots without heavy structure.
- Insulates root zone against rapid temperature swings, helping root function and nutrient uptake.
- Blocks light from entering the nutrient reservoir, which reduces algae growth that competes for oxygen and nutrients.
- Is easy to cut and customize to fit net pots and spacing shown in the photo.
What you need (materials and key specs)
- White polystyrene board or foam box lid (rigid, food-grade if possible), thickness 2–4 cm.
- Net pots 5–7 cm (2–3 inch) diameter to fit holes cut in the foam.
- Growing medium for net pots: rockwool cubes or coconut coir plugs.
- Reservoir container sized for 4–8 plants (10–30 L depending on number).
- Air pump + air stone (one 4–8 L/min pump for 4–6 plants; scale up for larger systems).
- Complete hydroponic nutrient formulated for vegetables; EC meter and pH meter.
- Trellis or vertical string support; clips or ties for training vines.
Step-by-step setup and preparation
- Cut the foam lid: mark holes spaced 25–30 cm apart (spacing used in the photo). Cut circular holes slightly smaller than your net pots so pots sit snug (5–7 cm diameter typical).
- Seal and protect: if the foam is porous or old, line the underside of each hole with a thin food-safe plastic or silicone gasket to prevent crumbly edges falling into the reservoir.
- Assemble reservoir: place the foam lid over the container, leaving 2–5 cm of nutrient solution below the net pot base so roots can reach water. Ensure the lid blocks light from the reservoir to reduce algae.
- Install aeration: place an air stone and run the air pump to keep oxygen levels high at the roots (continuous operation).
- Prepare seedlings: transplant cucumber seedlings when they have 3–4 true leaves (typically 3–4 weeks after germination) into rockwool or coir in the net pots, then place them in the foam holes.
- Trellis and training: install vertical strings above each plant and begin training the main stem within the first 1–2 weeks after transplant to encourage vertical growth and lots of side fruiting branches.
Nutrient dosing, pH and schedule (precise and seasonal)
For reliable fruiting use measurable targets and a fixed replacement routine.
- EC target: Start at EC 1.6 mS/cm (approx. 800–900 ppm) during establishment (first 1–2 weeks after transplant). Increase gradually to EC 2.0–2.4 mS/cm (1100–1400 ppm) when flowers appear and fruit set begins.
- pH target: Maintain pH 5.8–6.2. Check pH every 2–3 days and adjust as needed with pH down or up solutions.
- Water top-up: Top up reservoir with plain water every 2–3 days to maintain volume and keep EC within range.
- Full solution change: Replace the entire nutrient solution every 10–14 days. Clean the reservoir and foam lid lightly and refill with freshly mixed nutrient at target EC.
- Air and temperature: Run the air pump continuously. Keep root zone 20–22 °C and ambient temperature 20–26 °C for steady fruiting.
- Lighting: Provide 12–16 hours of strong light (sunlight or grow lights) daily; reduce to 12 hours if excessive vegetative stretch occurs.
Growing and maintenance tips from experience
- Train early: wrap the main vine clockwise around the string and remove lower leaves to improve airflow and reduce disease.
- Pollination: indoors you may need hand pollination. Use a soft brush to transfer pollen from male to female flowers every 2–3 days during peak flowering until bees are present.
- Spacing for yield: maintain 25–30 cm between plants so each vine has access to light and airflow — the spacing in the photo is ideal for vertical, high-yield production.
- Prune selectively: pinch off side shoots beyond the second or third node to focus vigor into fruit production rather than excessive foliage.
- Watch EC drift: cucumbers use a lot of water; EC can rise quickly as water evaporates. Check EC every 2–3 days and top up or dilute as needed.
Common botanical errors to avoid
- Ignoring pH: nutrients become unavailable if pH drifts outside 5.5–6.5. Check and correct regularly.
- Over-concentrating nutrients: Too high EC causes leaf burn and blossom drop. Increase EC gradually and never jump >0.3 mS/cm at once.
- Poor aeration: insufficient oxygen at the roots causes root rot. Always run an air pump and keep surfaces clear of algae.
- Poor light and pollination: strong light and pollination are required for fruit set — a great nutrient program won’t make cucumbers fruit without these basics.
- Using degraded foam: UV-weathered or crumbling polystyrene can shed particles into the reservoir. Replace or seal such foam; use clean, intact foam lids only.
Timeline and expected results
Follow this rhythm for predictable harvests: transplant seedlings at 3–4 weeks old, expect first flowers within 2–3 weeks after transplant, and consistent harvests several weeks after flowering begins. With steady nutrient, light and trellising, a small foam-raft system can produce multiple cucumbers per plant weekly over a 6–12 week main crop period.
Conclusion: try the foam-raft method and scale up
The white polystyrene foam raft you see in the image is more than cosmetic — it’s a practical, low-cost support that reduces algae, insulates roots and makes a compact, high-yield hydroponic cucumber setup possible at home. Use the exact spacing, pH, EC and replacement schedule above, combine it with good light, ventilation and pollination, and you’ll see steady yields over several weeks. Ready to try it? Start with 4 plants in a 15–20 L reservoir, monitor EC and pH as described, and scale up when you see reliable fruiting.
Action step: cut your foam lid, set up an aerated reservoir, and transplant a seedling this weekend — check EC and pH every 2–3 days and plan your first full nutrient change in 10–14 days.